All about civil construction knowledge- PARAM VISIONS

Checklist for column reinforcement./ Points to be checked in column reinforcement.

  Following are the 11 points that should be checked in the column reinforcement work before concreting.

1. Quality of bar:


The steel bar should be straight & fresh, having a blackish-grey color in appearance. The rusted rebar should be avoided as they have low bonding strength with the concrete. The ribs over the bars should be uniform in their thickness without any breaks in them.


2. Grade of steel:

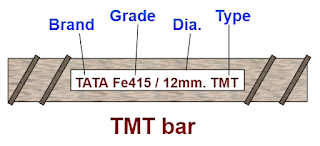
The grade of the steel bar should be chosen, as mentioned in the reinforcement detail drawings. You can find the grade of steel embossed over the bar, as shown in the above image. 

Checking the steel grade is a must, as it indicates the yield strength & decides the load-carrying capacity of the rebar. 


3. Plumb check:


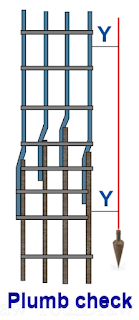
The column reinforcement should be checked for its verticality so that the clear cover should be uniform from the shuttering formwork.

 There should not be any twist in the tied reinforcement bars when compared at the top & bottom end of the rebar.


4. Clear cover:


The column cover blocks should be used to maintain the equal clear cover as mentioned in the drawing.

If you are using circular cover blocks, care should be taken to insert them in the lateral ties at the required intervals to maintain a clear cover from the concrete.


5. Diameter & spacing of bar:

 
The column bar diameter should be checked before anchoring the lateral ties to them. The column reinforcement may contain bars of different diameters according to the structural design.
The c/c spacing between the two bars should be measured as per the drawings. 

If not mentioned in the drawing, the bars are placed at an equal c/c distance in the given axis, as shown above.

6. Dia. & spacing of lateral ties:

The diameter &  c/c distance between the lateral ties should be checked before erecting the formwork. The lateral ties should be perpendicular to the main bar & there should not be any ups & downs in their periphery.


7. Hook length: 


The hook's length of the lateral ties should be measured before we tie them to the main bar. If not mentioned, we can calculate them as 10d, where d is the diameter of the bar.

The corner bend should be at 90°, & the angle at the hook bend should be 135°, as shown above.


8. Lateral tie position:


The c/c distance of the lateral ties varies according to the column zone & lapping zone of the reinforcement. In the lapping zone, the lateral ties are closely spaced as shown above.

Care should be taken that, there should be at least one lateral tie above the concreting level of the column.

9. Development length:

The development length of the column reinforcement should be checked for its proper length as per the drawing, to achieve the designed bond strength.

Go through: What is development length in construction? / Reasons for providing development length & factors affecting it.


10. Bar lapping:


The lapping of the bar should be staggered as shown above. The top end of the column bar should not be at the same level if further lapping is needed for the column extension.

Go through: What is lap length in reinforcement bars?/ General rules while providing lap length.


11. Binding wire:


Once the binding wire is tied at the corner of the lateral ties, the wire knot should not be protruded into the concrete cover area. Give instructions to the workers to push them within the reinforcement area, so that the construction quality is maintained.

For you 👇

❤ Different types of rebar ties/Different ways of tying rebar with binding wire.


Thank you for going through this article. Have a good day😄.

Share:

Checklist for beam shuttering./What are the points to be checked in beam formwork?

 Following are the 10 points that should be checked in the beam shuttering work before concreting.

1. Formwork quality:


The minimum thickness of the plywood should be 12mm. for the beam formwork. For the heavier structural beams, plywood of thickness 18 mm. or above should be used to avoid bulging. 

The plywood should be fastened with adequate wooden batten ( Patti ) at the appropriate intervals as shown above. The inner surface of the shutter mold should be clean & even, without having any concrete particles adhered to it.


2. Shuttering oil:


Before the installation of the beam formwork, shuttering oil should be applied to the inner plywood surface. The oil helps in easy de-shuttering work & provides a good surface finish to the beam concrete.

3. Beam size:

The length, breadth & depth of the individual beam as required should be checked at both ends of the beam. By using the string line, the top edge of the shutter should be checked for its alignment & straight line. 


4.  Plumb of vertical formwork:

The formwork of the beam should be checked for its verticality by using the plumb bob or spirit levels. The measurement of the string distance should be taken from the plywood surface at the top & bottom levels of the formwork. The shutter should be adjusted for its verticality until we get an equal measurement (say y ) at the top & bottom plywood area.


5. Soffit level:


The level of the soffit formwork should be checked on both axes by using the spirit level as shown above.

The level should be checked at both the ends of every individual plywood shuttering ( usually 8ft. ) or at the joining area of the two formwork. 


6. Beam position:


The position of the beam shuttering should be confirmed by measuring the distance (as required ) from the beam next to it or from the edge of the slab.

As you can observe in the above drawing, the position of beam A should be confirmed by checking the distance X & Y from the beam existing on either side of it.


7. Beam level:


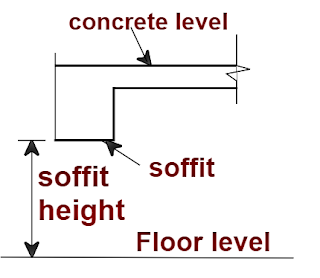
The soffit height from the floor level should be checked by using a level tube or auto-level instrument. The finishing level or top surface of the concrete level ( slab level ) should be marked over the formwork beforehand. 


8. Beam support:


The soffit of the beam should be supported with the props at the required distance as shown above. The props should be properly nailed to the wooden planks at the bottom end. Check the firmness of the props by shaking with your hand. They should not come loose or move from their position.

Bracing should be provided at a distance of 1.2m to1.5m from the floor level. The bracing should be in a horizontal position on both axes for individual rows of the props. 


9. Gaps or openings:

If there are any gaps or openings in the formwork, the cement slurry comes out through those gaps at the time of vibration. So, if you find any openings in the shuttering, they should be properly sealed. Smaller gaps can be filled effectively by using pieces of rubber or foam sheets.


10. MEP check:

MEP stands for mechanical, electrical & plumbing works. If any conduits, sleeves, or pipes pass through the beam formwork, they should be properly installed beforehand by making cuts & groves in them.

👀  To go through all types of construction-related procedures & checklistsclick here.

Thank you for going through this article. Have a good day😄.
Share:

What is shower drain hair catchers or hair strainers?/Different types of drain hair catchers.

 1. What is hair catchers or hair strainers for drains?

The material that prevents the clogging of your drains due to hair accumulation and allows the smooth flow of the water through them is called hair catchers.


The hair catchers are also called by the name hair stoppers, hair drain filters, or hair strainers according to the manufactured type, usage, model & design.


2. What are the different types of hair catchers?

The drain's hair catchers are classified into two main types. They are

1. In drain hair catchers &

In-drain hair catcher.

In drain, as the name suggests, fits inside the drain pipes fully or partially. Before buying the in-drain type hair catchers, you have to check the diameter of your drainpipe, so that the product can be inserted within the drain.


2. Screen hair catchers.

Screen hair catchers.

Screen hair catchers are kept over the existing drain holes to catch the hairs as shown above.

These products are available in different colors, shapes, & sizes to suit the customer's needs.


3. Where we can use the drain hair catchers?

The hair catchers can be used in all types of drains to filter the hairs that otherwise will clog the drain.

The four main locations where we can fit them are, 

1.  Bathroom drain or shower drain. 

2. Washbasin or wash sink drain. 

3. Bathtub drain hole. 

4. Kitchen sink drain.

When we use them in the kitchen sink, they work as strainers, since they filter the leftover organic materials rather than catching the hairs.


4.  What are the different materials used in making shower drain hair catchers?

The three types of materials are mainly used to manufacture drain hair catchers. They are,

1. Stainless steel.

Stainless steel hair catcher.


2. Silicon

Silicon drain hair catchers.


&

3. Plastic.

Plastic drain hair catchers.


5. Which are the top 3 brands in shower drain hair catchers?

The most popular brand & users choice is, 

1. Lekeye shower drain hair catcher.

2. Tubshroom drain hair catcher. &

3. Oxo drain hair strainer.


For more such explanatory articles, click here.
Share:

What are the points to be checked in column shuttering? / Checklist for column formwork.

 Following are the 10 points that should be checked in the column shuttering work before concreting.

1. Formwork quality:

The minimum thickness of the plywood should be 12mm. for the residential columns. For the heavier structural columns, plywood of thickness 18 mm. or above should be used to avoid bulging. 

The plywood should be fastened with adequate wooden batten ( Patti ) & yoke (Chavi) at the appropriate intervals as shown above. The inner surface of the shutter mold should be clean & smooth, without any concrete particles adhered to it.


2. Shuttering oil:


Before the installation of the column formwork, shuttering oil should be applied to the inner plywood surface. The oil helps in easy de-shuttering work & provides a good surface finish to the casted concrete.


3. Verticality through plumb: 

Any two adjacent shutter sides should be checked for verticality by using the plumb bob as shown in the above image. If you check the plumb of side AD, then side AB or DC should be checked with the plumb bob. 

The string attached to the plumb should be at the same distance from the surface of the plywood when measured at the top & bottom parts of the shutter. Suppose if the top measured distance is Xmm., then we should adjust the column formwork to provide us with the same Xmm. measurement at the lower shuttering part.


4. Corner angle:


All four corner junctions of the column shutter should be at a right angle to each other (from inside). The same can be confirmed by using a try-square tool. If they form a parallelogram-like shape, it should be corrected to a 90° angle.


Try square.


5. Column diagonal:


The diagonal AC & BD should be checked from the inner corner of the plywood. Always, the measurement of diagonal AC & BD should be equal, to ensure the perfect shape of the column.

6. Column position:


The position of the column shutter should be checked by measuring the required length from the neighboring columns. 

If you want to confirm the position of column A (as shown above ), the distance X & Y should be checked to align column A in a proper position. The shutter alignment should be done on both axes as shown above.


7. Gaps or openings:

If there are any gaps or openings in the shuttering work, the cement slurry oozes out through those gaps at the time of vibration. So, if you find any leftover openings in the shuttering, they should be closed properly. Smaller gaps can be filled effectively by using rubber or foam sheets.


8. Shuttering clamps:


When the concrete is poured & vibrated in the shutter molds, they have a tendency to bulge & move apart due to the compaction of concrete. Clamping the shuttering material is a must to hold them firmly in their position. 

A shutter clamp ( Shikanja ) or nut bolt system can be used to hold the Chavi that are opposite to each other.


Shuttering clamp.


9. Concrete level:

The filling level of the column concrete should be transferred by using level tubes and marked over the formwork.


10. Column support:


All the column props should be nailed properly to the wooden planks or any such supports. The props should be checked for their firm grips without any loose movements when shaken.


👀  To go through all types of construction-related procedures & checklistsclick here.

Thank you for going through this article. Have a good day😄.


Share:

What is air entrained concrete?/ Why the air-entrained concrete is produced?


 The concrete that contains tiny air pockets or bubbles throughout its structural volume is called air-entrained concrete.


Air-entrained concrete is produced by adding air-entraining agents or admixtures into the production process of the concrete.

These admixtures produce a large number of tiny air bubbles of 0.3mm. or lesser size in the concrete structures. When the concrete gets hardened, these bubbles create a space for air cells.

Now the question that arises is,

Why the air-entrained concrete is produced?

Water molecules expand and contract due to the freezing & thawing action of the atmosphere. When the concrete freeze, the moisture or the water molecules present in the concrete, tries to expand within the body of the structure. These water molecules regain their normal volume when the climate becomes normal. These regular expansion & contraction in the volume of the water generates cracks or fissures in the concrete structures. 

The deliberate intrusion of air pockets within the concrete provides the required space for the water molecules when they expand. This extra air space relieves the water pressure over the concrete structures. So, air-entrained concrete enhances the life span of the structure, when used in such atmospheric conditions.

Generally, 4 -7% of air bubbles (by volume) are produced in the total volume of the concrete. 

When compared to the normal concrete, the compressive strength of the air-entrained concrete is less, due to these air pockets. Larger the percentage volume of air cells, the lesser the strength of the entrained concrete & vice-versa.

For more such explanatory articles, click here.

  Thank you for going through this article. Have a good day😄.


Share:

Why desert sand is not used for the construction works? / Why sea sand & desert sand are not used in civil construction?

 Desert sand is not used for construction works, because it does not satisfy the criteria or specifications required to be used as a construction material.


Let us now go into detail about, why the desert sand is treated as unfit for construction works.

Desert sand or sea sand has the following  4 properties, that are against the construction norms.

They are,

1. Desert sand is round in shape.

2. They have a smooth surface finish.

3. The particle size of the desert sand is very fine.

4. They are slightly alkaline in nature. 


1. Round shape:


The sand used for construction work should be angular in shape to densely pack with each other, leaving no space in between the sand particles. Most parts of the desert sand particles are round in shape, which creates voids in between them, having a weak interlocking capability.


2. Smooth surface finish:


The construction sand should have a rough surface finish to make a good bond strength with cement & coarse aggregates. The smooth surface of the desert sand does not fulfill these criteria, as it creates a weak bond strength in the concrete materials.

As you can observe in the above image, the construction sand particles are angular in shape having a rough surface texture.


3. Fine sand particles:


The particle size of the construction sand should pass the sieve analysis test to attain the required design strength. The fineness of desert sand does not allow it to be used in the construction work, as they fail in the sieve analysis test. 

As the sand act as a filler material between the coarse aggregates, their size should be large enough to satisfy this condition. 


4. Alkaline in nature:

The concrete becomes weak in its strength when we use sand having alkaline content in them. When the water evaporates in the desert region, they leave salt content in the sand.

In the case of river sand, the salt, and other chemical impurities get washed away by the flowing water. The salt content also creates dampness & efflorescence in the building structures. 

So, again the desert sand is declared unfit to be used in the construction works due to this reason.

Note:

 Sea sand has the same characteristics similar to desert sand. The worst thing is, that they contain more salt content when compared to desert sand.


To get the answer to more such construction-related FAQs, click here.

Thank you for going through this article. Have a good day 😄.


Share:

What is laminar flow & turbulent flow?/Difference between laminar & turbulent flow in a fluid.

There are two main types of flow of a fluid based on their particle movements.

They are, 

 1. Laminar flow:


When the particles of the fluid move parallel to each other without crossing one another's line of movement is called laminar flow. The particle always moves in the same direction & they do not disturb one another.

The other characteristic that describes the laminar flow is,

1. In laminar flow, Reynold's number is less than or equal to 2300.

2. The flow of fluid is orderly, smooth & in a regular pattern.

3. There is no variation in the velocity & pressure of the fluid.

4. The laminar flow usually happens in a smaller sectional area at a lower velocity.


The eg. for the laminar flow is the movement of water in a pipe of a uniform sectional area at a low velocity.


2. Turbulent flow:


When the particles of the fluid are moving in a zig-zag pattern and are not parallel to each other is called turbulent flow.

The other characteristic that describes the turbulent flow is,

1. In turbulent flow, Reynold's number is always greater than 4000.

2. There is a huge variation in the velocity & pressure of the fluid.

3. The fluid flow is irregular & they cross the path of one another.

4. The turbulent flow usually happens in a larger sectional area at a higher velocity.


The best example of turbulent flow is the movement of water in a flooded river.


Thank you for going through this article . Have a good day 😄.

Share:

How to calculate the self weight of RCC slab, beam, & column?/ How to find the self-weight of RCC structures?/Dead load of RCC structures.

 Let us now calculate the self-weight or dead load of the RCC structures as shown in the drawing.


Given data:

RCC slab

Length = 4m ( Ls ) 

Width = 3.3m ( Ws )

Thickness = 125mm =0.125m. (Ts )


RCC beam

Length = 4m ( Lb )

Width = 230mm = 0.23m. (Wb )

Depth = 450mm = 0.45m. ( Db )


RCC column

Height = 2.7m. (Hc )

Width = 230mm = 0.23m ( Wc )

Length = 450mm = 0.45m. ( Lc )


The self-weight of any RCC structure is calculated by the formula

  = [Unit weight × volume.]

As you know, the unit weight of the RCC structure = D =2500kg/cum.


If you are looking for a readymade calculator for the self-weight of structures, then click here.


1. Self-weight of the slab

Wt. of the slab

     = [unit weight× volume of the slab]

     = [ D × ( Ls × Ws × Ts )]

     = [ 2500kg/cum. × ( 4m. × 3.3m. × 0.125m. )]

     = [ 2500kg/cum. × 1.65cum.]

     = 4125kg.


2. Self-weight of the beam

Wt. of the beam

    = [unit weight × volume of the beam]

    = [ D × ( Lb × Wb × Db )]

    = [ 2500kg/cum. × ( 4m. × 0.23m. × 0.45m. )]

    = [ 2500kg/cum. × 0.414cum.]

    = 1035kg.


Go through the article 👇

👀.  Calculating the self-weight of the brick wall.


3.  Self-weight of the column

Wt. of the column

   = [unit weight × volume of the column]

   = [ D × ( Hc × Wc × Lc )]

   = [ 2500kg/cum. × ( 2.7m. × 0.23m. × 0.45m. )]

   = [ 2500kg/cum. × 0.279cum.]

   = 698.63kg.


For all types of structural design articles,  click here.


Thank you for going through this article. Have a good day😄.


Share:

What are the points to be checked before buying TMT bars?/ Check list to purchase steel bars for construction.

 Following are the 11 points, that should be observed before buying a TMT bar, without doing any tests over the bars.


1. Brand :

Always go for the top brand while buying the TMT bars from the market. They may cost 5 to 10% more when compared to the other locally manufactured steel bars. My suggestion is, don't compromise on quality to save a little money in your budget. 

Some of the top brands in India are 1. Tata steel.  2. JSW steel.  3. Jindal steel.  4. ESSAR steel etc.


2. Grade of steel :

As you can observe in the above drawing, you will find the grade of steel embossed over the bars. Select the right one, to suit the design of your structure.


3. Bar diameter:

Check the diameter of the bars to purchase the right amount of steel bars of needed size & weight. You will find the diameter on every bar, as shown in the above drawing.


4. Type of bar:

Different types of bars are available in the market having different mechanical & chemical properties. Among them, TMT bars are the most widely used ones, in the construction of residential buildings.

Note: Go through the article Different types of steel bars used in construction.   to understand the rebar classification.


5. Surface ribs:


The ribs over the rebars should be uniform & clear, placed equidistant from each other (as shown above). These ribs play a major role in developing a good bond strength with the concrete to provide the required stability to the structure.


6. Rusted rebar:


The fresh rebars are grey in color. When the steel bars are exposed to atmospheric moisture for a longer duration, they get rusted due to oxidation. As you can observe in the above image, the rusted bar turned orange-brown in color. 

At any cost, you should not buy rusted bars. They create a decreased bond strength & affect the life span of the structure. 


7. Rebar test certificate:


When you deal with the trader, ask for the rebar test certificate to know the specification & strength of the bar of different diameters. All the branded manufacturers have these test certificates, to maintain the standard & quality of rebars.


8. ISI mark:


The Industrial Standards Compliance ( ISI ) is set for the steel bars to ensure quality while manufacturing them. Check for the ISI mark before buying the bars. 


9. National certification :

While manufacturing the steel bars, different types of codes or standard certifications are followed to meet the required properties & specifications of rebars. 

The general codes or certifications that are used are IS 1786, IS 432 (MS ), ASTM A706, BS 449, ASTM A615, JIS G3112, etc. Check the manufacturer's certification, to know the characteristic properties & bar quality.


10. Steel brochure:


Go through the steel bar brochure, to know the chemical composition like percentage of carbon content in steel, mechanical & chemical properties, rebar weight tolerance, etc.


11. Bundle weight:

The manufactured bars may be underweight, theoretical weight, or overweight, depending upon the dye used while casting the bars. If the weight of the bars is above the tolerance limit, then you will pay more money for that extra weight. 

The weight of the bundle should be within the purchase range, according to the tolerance given in IS-1786.

So, check the weight of each bundle of TMT bars and compare them with the purchase range table of that particular diameter bar.

To know the theoretical weight & purchase range of the steel bundle, go through the table in the article,

Tolerance or rolling margin for the steel bundle as per IS-1786.


👀  To go through all types of construction-related procedures & checklistsclick here.

Thank you for going through this article. Have a good day 😄.


Share:

What is thermocol ceiling? - advantages & disadvantages.

 The thermocol sheets are used to create the secondary or false ceiling to enhance the architectural look of the building's interior.


The thermocol sheets can be cut, carved, & engraved easily to create the required designs & patterns over the false ceilings.


Thermocol false ceilings are cheaper, light in weight, & help to cool down the interior room temperature.


Now you may start thinking, 

What is a thermocol material?


Thermocol is a hydrocarbon polymer made from the monomer known as styrene. The technical name of thermocol material is polystyrene.

They are light in weight & are not biodegradable. They are flammable material, leaving black smoke upon burning.


What are the advantages & disadvantages of thermocol ceiling?

Advantages:

1. Reduces temperature:

 Thermocol acts as a barrier for heat transfer from the ceiling of the building. It creates a cool interior, especially in the summer season.

2. Lightweight:

The thermocol sheets are light in weight, thus the load transferred over the building structure is negligible.

3. Economical:

The false ceiling created by the thermocol material is very cheap when compared to all other types of secondary ceilings.

4. Easy to work:

Cutting, creating designs, & placing them in the required position is an easy job with thermocol material.  The ceiling work can be completed in very little time & two to three workers can finish the installation job.

5. Covers the open wiring:

If any open wiring system is installed in the ceiling, the thermocol sheet hides them to give a good interior look.

6. Aesthetic appearance:

Any fixtures like flat LED lights, CCTV cameras, chandelier lights, etc. can be set in the ceiling work to bring a royal look to the home interior.

7. Easy to paint:

You can paint the thermocol ceiling with any required color to enhance the richness of the room.


Disadvantages:

1. Hides ceiling defects:

If there is any dampness, seepage, or cracks in the ceiling, you cannot recognize them due to the coverage of the false ceiling. This ultimately weakens the building, as you cannot take timely action to repair the structure.

2. Flammable material:

The thermocol sheet catches fire in the event of fire hazards, as they are a flammable material.


For more such explanatory articles, click here.


Share:

Translate

Blog Archive

popular posts

Recent Posts

Google search