All about civil construction knowledge- PARAM VISIONS

Calculating the volume of concrete in a triangular pile cap having 3-piles.

 Let us calculate the volume of concrete in a triangular pile foundation having 3 nos. of the pile, as shown below.


Given data:

Pile diameter = 0.6m.( d )

No. of piles = 3 nos.

Length of pile = 16m. (h )

Depth of the pile cap = 0.9m. (D )


Calculation:

The volume of concrete in the piles

= [3nos.× πr2 h]

Here,

r = radius of the pile.

= [d ÷ 2]

= [0.6m ÷ 2]

r = 0.3m.

h = length of the pile.


The volume of concrete in piles

= [3nos. × 3.142 × (0.3m)2 × 16m.]

13.57 cum.


The volume of concrete in the pile cap :

The volume of  pile cap concrete

=  [Surface area (A ) × depth ( D )]

First, let us calculate the sectional area (A1) of rectangle ABCD, as shown in the below drawing.

Area of rectangle ABCD (A1)

    = [L × B]

    = [2.2m × 2.0m]

    = 4.4 sqm.

To get the surface area ( A) of the pile cap, we have to deduct the area of triangles AEF & GDH from the rectangle area.

Here,

 Triangle AEF = triangle GDH 

Area of triangle AEF 

= [0.5 × base × height.]

= [0.5 × side AE × side AF]

Side AE 

= [ ( 1/2 ×side BC ) - (1/2 × side EG )]

=  [ ( 1/2 ×2m. ) - (1/2 × 0.6m. )]

= [ 1m - 0.3 m ]

= 0.7m.


Side AF 

= [side AB - side FB]

= [2.2m - 0.7m]

= 1.5m.


I have redrawn the triangle, with the calculated length of the sides AF & AE as shown below.

Area of triangle AEF

 = [0.5 × side AE × side AF]

= [0.5 × 0.7m × 1.5m.]

= 0.525 sqm.


 The surface area of the pile cap (A )

= [area of rectangle ABCD - (2nos. × area of a triangle AEF )]

= [4.4 sqm. - (2nos. × 0.525sqm.)]

= [4.4 sqm. - 1.05 sqm.]

= 3.35 sqm.


Now, 

the concrete vol. of pile cap

= [surface area (A ) × depth (D )]

= [3.35 sqm. × 0.9m.]

= 3.015 cum.


The total concrete volume of the 3-pile foundation

= [The vol. of concrete in pile cap + total vol. of concrete in piles.]

= [3.015 cum + 13.57 cum.]

 16.585 cum.

To go through the articles on Estimation & calculation in civil engineering, click here.

Thank you for going through these calculation steps. Have a good day 😄.

Share:

How to calculate the volume of concrete in a rectangular pile cap having circular piles?

 Let us now calculate the volume of concrete in a rectangular pile foundation having 6 nos. of the pile, as shown below.


Given data:

Pile diameter = 60 cm = 0.6m.( d )

No. of piles = 6 nos.

Length of pile = 18m. (h )

Size of the pile cap = 4.5m ( L ) × 3.0m. (B )

Depth of the pile cap = 0.9m.(H )


The volume of concrete in a pile cap

= L × B × H

= 4.5m × 3.0m ×  0.9m

= 12.15 cum.


The volume of concrete in the piles

= 6nos.× πr2 h

Here,

r = radius of the pile.

= d ÷ 2

= 0.6m ÷ 2

= 0.3m.

h = length of the pile.


The volume of concrete in piles

= 6nos. × 3.142 × (0.3m)2 × 19m.

= 32.23 cum.


The total concrete volume of the pile foundation

= The vol. of concrete in pile cap + total vol. of concrete in piles.

= 12.15 cum + 32.23 cum.

= 44.38 cum.

To go through the articles on Estimation & calculation in civil engineering, click here.

Share:

Comparing the JCB & manual excavation cost for footing. / Excavation cost of manual versus excavator.

 Let us now compare the excavation cost of JCB & the manual, for the foundation work of buildings.


First, you have to go through the following two articles, for a clear understanding of the excavation cost from these 2 methods. 

For you 👇

Rate analysis of the JCB excavation for the building footing.

Manual excavation analysis for the building foundation.

The cost of excavating the same volume of earthwork manually & by using JCB is calculated as follows.

   The excavation cost by JCB = INR 3000/-

   Cost of manual excavation = INR 10560/-

Note: The excavation values are from the above linked two separate articles.

From the above-given value, we can say that if the cost of excavation by JCB is INR X/- then the same quantity of work needs INR 3.52X/- if done manually. 

In other words,

Manual excavation of building footing is 3.52 times costlier than the JCB excavation.

So, always go for the JCB, if you want to save money in your allocated budget.


What are the advantages & disadvantages of using JCB for excavation work?

Advantages:

1. Less excavation cost: 

Excavation work by JCB is cheaper when compared to manual excavation. You can complete the work just by using 30% of the allocated money for excavating manually. 

2. Saves time: 

The work can be completed in very little time. 3 to 4 hours is enough to complete the footing excavation work of residential buildings.

3. Efficient in all types of soils:

 Excavating with JCB is more efficient in hard soil as well as in soft rocks. Excavating manually in such type of soil is a tedious job.


Disadvantages:

1. More working space: 

We cannot use the JCB in congested places, as it needs some space to work with to install & turn around.

2. Excavates more volume of the earth:

 We need to add the extra dimension in the required size of the footing pit when we use JCB for excavation. The reason is, that the bucket of JCB cannot cut the pit in an exact vertical line. Excavation creates a curved soil surface, as shown in the above drawing.  


What are the preparations & precautions to be taken, before excavating with a JCB?  

1. Extra marking

The marking of the footing pit by the addition of 8" to 1ft. extra to its required length & breadth should be done, before the arrival of JCB.

2. Using marker powder :

 Use a line marking powder of good quality to establish the pit excavation size so that, it can be seen easily while carrying out the excavation work.

3. Plan beforehand:

Do a good plan of starting & ending point of pit excavation beforehand. Once the excavator comes to your site, every minute of the hour is important as you pay for it. The faster you take the work with the JCB, the more profitable you are.


To go through the comparison & difference between the several types of building materials & construction costs, click here.

Thank you for going through this article. Have a good day😄.

Share:

Rate analysis of the JCB excavation for the building footing./ Calculating the cost of excavation done by JCB.

 Let us make a cost analysis of the excavation of the footing pit by JCB for the below-given drawing.


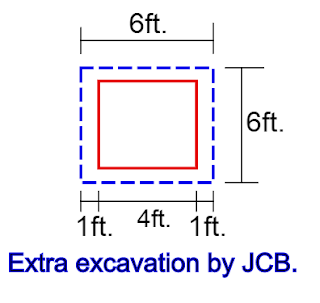
To excavate the footing pit of the above dimension by JCB, we have to take 8" to 1 ft. extra on either side of the pit as shown below.


The extra cutting is necessary, as the JCB bucket does not cut the footing pit sides in vertical lines & perpendicular to each other (as shown above). 
Let us consider the maximum extra dimension, by extending the length & width by 1ft. on all four sides.

Given data:

Adjusted size of the footing pit = 6ft. × 6ft.

Depth of footing pit = 5ft.

No. of footings = 12nos.


Calculation:

The volume of the total excavation

= [12nos. × L × B × H]

= [12nos. × 6ft. × 6ft. × 5ft.]

= 2160 cu ft.


The market rate for the JCB excavation is INR 800/-  to INR 1200/- per hour., depending upon the regional availability & demand.

Let us consider an average rate of INR 1000/- per hour, for the calculation purpose.

The excavation capacity of the JCB ranges from 700 cu ft. to 1100 cu ft. per hour, depending upon the type of soil & bucket capacity.

Let us consider an average excavation capacity of 900 cu ft./ hour for the calculation.


The cost of excavation of all the footings

= [(Total vol. of excavation ÷ excavation capacity/hr. ) × JCB rate

= [(2160 cu ft. ÷ 900 cu ft/hr. ) × INR 1000/-

=[2.4hour × 1000/hour ]

= INR 2400/-  (theoretical cost)

But when we do the excavation practically, the JCB takes 3mins. extra time per footing, to reset in line with individual footing.

Total time taken by JCB,

 = [(Total vol. of excavation ÷ excavation capacity/hr ) + ( extra time to reset) ]

= [(2160 cu ft. ÷ 900 cu ft/hr) + (no. of footings × extra time per footing )]

= [ 2.4hour + ( 12nos. × 0.05 hrs )]

{as 1 hr. = 60min., 3min = 0.05 hr.}

= [ 2.4 hour + 0.6 hour ]

= 3 hours.


The actual cost of excavation 

= excavation time × JCB rate/hr.

= 3 hour × 1000/ hr.

= INR 3000/-


To go through rate analysis & cost-related articles, click here.

Thank you for going through this article. Have a good day😄

Share:

Manual excavation analysis for the building foundation./ Rate analysis of manual footing excavation.

 Let us make a rate analysis for the below-given footing excavation drawing.


Given data:

Size of the footing pit = 4ft. × 4ft.

Depth of footing pit = 5ft.

No. of footings = 12nos.


The volume of the total excavation

= 12nos. × L × B × H

= 12nos. × 4ft. × 4ft. × 5ft.

= 960 cu ft.


The market rate for manual excavation is INR 8/-  to INR14/- per cu ft., depending upon the regional labor cost.

Let us consider an average rate of INR 11/- per cu ft. for calculation purpose.


The cost of excavation of all the footings

= Total vol. of excavation in cu ft. × rate/ cu ft.

= 960 cu ft. × 11/ cu ft.

= INR 10560/-


Alternate method:

The labor charge of digging a footing pit of size 4' × 4' × 5'  varies from INR 700/- to INR 1000/- per pit.

Let us consider an average rate of INR 850/- per footing pit for calculation purpose.


The cost of footing excavation

= No. of footing pit × excavation rate per pit.

= 12 nos. × 850/-

= INR 10,200/-


 Important point:

Before doing the excavation work, it is better to analyze the working cost by using both methods. Then you can execute the work that is comparatively cheaper, to save in your budget.

NOTE:

The labor rate varies according to the location where you live. Please include your regional market rate, to calculate the excavation cost.

To go through the articles on Estimation & calculation in civil engineering, click here.

Share:

Why don't we deduct the steel volume while calculating the concrete volume in RCC structures?

 When compared to the concrete volume, the quantity of steel that we are providing in the RCC structure is anywhere between 1% to 3% of the total concrete volume.

Let us calculate the quantity of steel and concrete in the below-given beam drawing, to understand the concept clearly.


  The volume of concrete in the beam

= [L × B × H]

= [(3.048m - 2nos. × 0.230m) × 0.23m × 0.3m ]

= 0.178cum.


The volume of steel

The volume of the main bar 

  = [4nos × 0.7855× d2× L ]

= [4nos × 0.7855 ×0.0122× 3.048m]

= 0.00137cum.


The volume of lateral ties

= [19nos.× 0.7855× d2× L ]

= [19nos.× 0.7855× d2× 1.124m.]

= 0.001cum


The total volume of the steel

= [0.00137 +0.001]

=0.00237cum


The steel volume %ge

= [(vol. of steel ÷ vol. of concrete ) × 100]

= [(0.00237 ÷ 0.178) × 100]

= 1.33%

From the above calculation, we understood that out of 100% volume, concrete plays the main role of having 98.67% of the total volume, & the contribution of steel volume is only 1.33%. 

While casting the RCC structures, the unaccounted wastage of the concrete will be somewhere around 3%, i.e. above the percentage volume of the steel.

By neglecting the steel quantity in the volume calculation of concrete mass, we can compensate for some percentage of wastage incurred. This helps us to make the calculated theoretical volume of the concrete to be nearer to the practical volume of the concrete molded in the RCC structure.

So, neglecting the steel volume became the standardized practice in the concrete volume calculation for the general purpose.


What are the different reasons for concrete wastage, while casting the RCC structures?

The concrete wastage is due to

1. Bulging of formwork:

 When the vibratory needle is immersed in the concrete, the formwork bulges a little due to the applied frequency, and concrete compaction. The increased formwork volume takes in, more volume of concrete.

2. Maintaining the level

It is difficult to maintain the exact top level of the RCC structure in their finishing process. We always go for the little extra concrete material, to be on the safer side.

3. Pouring the concrete

The concretes spill a little over the formwork and over the ground while pouring them into the molds.

4. Leftover concrete:

 In the process of mixing, transporting & placing the concrete, we use different constructional equipment like concrete mixers, trolleys, vibrators, etc. The concrete adheres to the equipment and tools that we use.  The leftover concrete material after the completion of the work in this equipment and tools contributes their share to the total wastage. 

To get the answer to more such construction-related FAQsclick here.

Thank you for going through this article. Have a good day 😄.

Share:

Calculating the quantity of water in an open well./Estimating the volume of water in an open well.

 Let us calculate the quantity of water present in the open well for the given drawing.


Given data:

Depth of water = h = 2700mm = 2.7m.

Outer diameter of RCC ring = D = 1200mm.

Ringwall thickness = 70mm.


Calculation:

The  formula for calculating the quantity of water in the open well

= [( π × d2 × h ) ÷ 4]

Here, d = inner diameter of the RCC ring.

First, we will find the value of d.

Inner dia. of RCC ring 

d = [outer dia. of the ring - ( 2nos. × ring wall thickness )]

   = [1200mm - ( 2nos. × 70mm. )]

d  = 1060mm.= 1.060m.


Quantity of water in the open well

=[ (π × (1.060m)2× 2.7m.) ÷ 4 ]

= [ 9.532 cum. ÷ 4 ]

= 2.383 cum.

As you know, 1cum = 1000 liters.

So, the quantity of water in the open well

= 2.383 × 1000 

= 2383 liters.


Easy alternate method:


Given data:

Depth of RCC ring = h = 300mm = 0.3m.

Outer diameter of RCC ring = D = 1500mm.

Ringwall thickness = 80mm.

Inner dia. of RCC ring 

d = [outer dia. of the ring - ( 2nos. × ring wall thickness )]

   = [ 1500mm - ( 2nos. × 80mm. )

   = 1340mm.= 1.34m.


The quantity of water that a single RCC ring can hold

= [(π × d2 × h) ÷ 4 ]

= [(3.142 × 1.342 × 0.3m.) ÷ 4]

= [1.692 cum. ÷ 4 ]

= 0.423 cum

= 423 liters.

Suppose, you have installed 40nos. of  RCC  rings of 1500mm dia. in your open well, and if the 9 rings are immersed in the water, 

then, the quantity of water present in the open well

= [No. of immersed rings × water holding capacity of one ring.]

=  [9 nos. × 423 liters ] 

= 3807 liters.


I have given a table of RCC open well rings of different diameters, for your easy calculation purpose.

Sl. No.

RCC ring

outer dia.

(D) in mm.

 Ring wall

thickness

in mm.


RCC ring

inner dia.

(d)in mm.

Depth of

the ring

(h)in mm.

Water holding

capacity

in litres.

1

1000

65

870

300

178

2

1200

70

1060

300

265

3

1500

80

1340

300

423

4

1800

90

1620

300

618


Note

The wall thickness and ring depth may vary according to the available RCC ring in your region.

By replacing the value of inner dia. and height in the above formula, you can calculate the water quantity for the open well, according to the installed ring dimension.

To go through all types of quantity estimate articles, click here.

Thank you for going through these calculation steps. Have a good day 😄.


Share:

How to calculate cement expiry date?/ How to check the expiry date of cement?

 1.  How to calculate the expiry date of cement bags?

Every bag of cement has manufactured dates printed over them as shown below.


As you can see in the above image, the manufactured date of cement is printed as W48 DEC Y13.

Here,   W stands for     👉   Week.

           DEC stands for 👉  Month.

           Y stands for      👉     Year.

W48 DEC Y13 means, the cement is manufactured on the 48th week of the year 2013 in the month of December. By observing the calendar (internet ), the 48th week is from Nov 25th to Dec1st of the year 2013.

We should add 3 months ( 90 days ) to the manufactured date, to get the expiry date of cement.

      1st Dec 2013 + 90 days. 

       = 28th February 2014 will be the expiry date of cement.

So, it is OK to buy this bag of cement before 28th Feb of the year2014.


The other pattern of printing the manufactured date over the cement bags is as below.


As explained above, W, M, & Y stands for a week, month & year respectively.


Now the next question that comes to your mind is,

2. Why the expiry date of cement is set for the 3months from the manufactured date?

Cement is a chemically active material that absorbs moisture from the air to undergo a chemical reaction known as hydration. When the cement gets hydrated in the bag, it reduces the strength of the cement. Just by looking at the bag, we cannot conclude the amount of hydration of stored cement, and practically, it is not viable to test every bag of cement for its compressive strength. 

 By trial & error method, it is concluded that on average, the cement losses 20% of its original strength after 3 months from the date of manufacture. This 20% strength reduction is within the safety standards that we consider while designing the RCC structures.

So, the time limit for the expiry of the cement bag is set as 3 months from the manufactured date to maintain the safety & quality of the construction works.

For you 👇


3. Do every bag of cement lose the same amount of strength at the expiry date?


No. The reduction in the strength of the cement bags at a given time period depends upon,

1. Storage: 
If the cement bags are stored according to the guidelines & procedure, the strength reduction will be minimized. 

2. Season:
 The moisture content present in the air will be more in the rainy season when compared to the summer season. So the strength reduction will be maximum on rainy days and when you buy the cement in the summer season, you may get the bags having a good level of strength nearer to 100%.

3. Type of cement : 
The hydration rate of different types of cement is according to the constituents used while manufacturing them. So, the degree of loss in strength at the expiry date depends upon the type & grade of cement.

Cement is a common building material used by a wider public. The tests carried over the cement bags for their quality at an individual level are minimal. The expiry date is set after 3 months so that, the general public can select fresh cement bags, to maintain the construction quality.


4. What will be the strength reduction of cement bags with the age?


The table for the reduction in the strength of the cement for the given period of time is shown below.


Sl.

No.

Time period.

Strength

Decrease in

strength

1

Fresh

100%

0%

2

3 months

70 - 80%

20 - 30%

3

6 months

60 - 70%

30 - 40%

4

1 year

50 - 60%

40 - 50%

5

2 year

40 - 50%

50 - 60%


Share:

How to select the best quality cement?/What are the points to be checked before buying cement?/14 things to consider before buying a cement bag.

Following are the 14 points that should be observed, before buying a cement bag.

1. Brand name :

While purchasing the cement, you should always go for the branded cement having good popularity (5 🌟). The branded cement may cost 5 to 15% more, in comparison to other local cement, but they are worth that price as there is no compromise in their quality. Check for the correct spelling of the printed brand name, to confirm the originality of cement bags.


2. Trademark/logo:

All type of branded cement has their unique trademark logo printed on the bag as shown above. Look out for those logos to avoid duplication.


3. ISI mark: 

If the cement bag has no ISI mark (India ) printed over them, then stand apart from such bags to have a longer life span for your construction works. If the manufactured cement bags are not according to the industrial standards compliance( ISI ), don't buy such bags to maintain the quality of construction works.


4. IS code :

While manufacturing the cement, different types of IS codes are followed to meet the required standards. You should check for the type of IS code ( as shown above ), to know the specification & cement characteristics.


5. Grade of cement:

Cement bags are manufactured in various grades like 33, 43, 53, etc. to denote the cement cube strength after 28 days of curing. You should look out for the required grade, that suits your work, to get better results.


6. Type of cement:

Different types of cement are manufactured, to match the type of structural work, working situation, and climatic conditions. Check over the bag, to know the type of cement you are dealing with. 


7. Net quantity/Weight of cement:

The most common weight of cement bags that are available in the market is 50kg. You can check over the bags mentioned as net Qty -50kg., for the confirmation of actual weight. 

The white cement bags are packed in different weights like 1kg, 10kg, 25kg, 50kg, etc. for purchasers' convenience. Calculating the weight vs price for each type of bag, before buying, helps you to save money.


8. Company address:

You do require the manufacturer's address for communication, in case you have any complaints to register against the dealer or the quality of supplied cement.


9. Use no hooks: 

MS hooks are used by some workers while loading & unloading the cement bags for transportation. Although using hooks make them work fast, these hooks create small openings in the cement bags. You have to look for such openings if any, while buying the cement bags. These openings give a passage for the air to circulate in the bags, which ultimately decreases the cement strength.  Strictly avoid such bags, to maintain the cement standards.


10. The expiry date:  

Cement loses its original strength gradually as the day progresses from its production date. Any bags older than 3 months from the manufactured date are unfit for construction works. So, check the manufactured week and month, to know the expiry date of cement. Always go for fresh cement to utilize its full specified strength.


11. The printed price (MRP ) :


Observing the MRP of the cement bag helps you to know, whether you are paying the right amount of money or the delivered bags are overpriced. 


12. Stitching of cement bag: 

Refilling the cement by mixing it with other components in the factory-made bags can be found by checking the bag stitchings.  To avoid duplicate adulterated cement, check the cement bag stitchings precisely. The restitched bags certainly look different, as they cannot mimic the original factory-made stitching. 


13. Authorized outlet: 

Always, try to buy the cement from the authorized outlet in your locality, to avoid duplication and to get a fresh stock of cement.


14. Lumps in the bag:


If the bags in the godowns are not stored according to the procedure, the cement in the bags may develop tiny grain-like lumps due to the absorption of atmospheric moisture. Press the bag hard and pinch the corner end of the bag with your fingers, to feel the powdery softness of cement. If you feel a stiff bag with grainy feelings, avoid such bags.


Note:

1. The printed location of the cement bags are not alike, & they are unique to each brand. For your observation, the MRP & manufactured date of the cement bags of two different companies are shown in checklist no. 10. & 11.

👀  To go through all types of construction-related procedures & checklistsclick here.

Thank you for going through this article. Have a good day 😄.

Share:

How to calculate the height of any buildings? (Type-1)/ How to calculate the height of an object using a theodolite?/Height of building by trigonometric levelling.

 Let us now calculate the height of the building using a theodolite as shown below.


First, you have to level the theodolite on the vertical axis and set the angle to 0° on the horizontal axis i.e. shown as a dotted line. You have to measure the distance (L ) of the building from the theodolite station point as shown in the drawing.

Bisect the top edge corner of the building using the theodolite and note down the value of angle θ1. Similarly, bisect the bottom edge corner of the building and write down the value of angle θ2.

Let us redraw the above triangles for calculation purposes with the measured angle values.

Let us name triangle 1 as ABC, where A is the theodolite station point.

Triangle ABC :


Given data:

Angle θ1 = 34° 7'

Length AB = L = 72m.

From trigonometry, 

   Tan θ1 = [opposite side ÷ adjacent side.]

               = [side BC ÷ side AB]

  Tan 34° 7'  = h1 ÷ 72m.

   h1 =  tan 34° 7' × 72m.

        = 0.67747 × 72m

        = 48.778m.


Let us name triangle 2 as ABD, where A is the theodolite station point.

Triangle ABD.


Given data:

Angle θ2 = 1° 12'

Length AB = L = 72m.

From trigonometry, 

Tan θ2 = opposite side ÷ adjacent side.

              = side BD ÷ side AB

  Tan 1° 12' 

                 = h2 ÷ 72m.

   h2 =  tan 1° 12' × 72m.

        = 0.02094 × 72m

          = 1.508m.


    Now, the height of a building 

    H = [h1 + h2]

       = [48.778m. + 1.508m.]

       = 50.286m.


Continued 👉 Type-2


To understand A to Z of surveying, click here.

Thank you for going through this article. Have a good day😄

Share:

What is a toughened glass? / What is a tempered glass?

Let us go through some of the FAQS related to the toughened or tempered glass, to understand them in a better way.

 1. What is toughened glass?


When the normal glass is heated in a temperature range of 620°c -650°c and cooled rapidly by using air jets, the normal glass changes its properties gaining 4 times more compressive strength. The glass so manufactured by the tempering process is said as toughened glass, or tempered glass, or safety glass.

The toughened glass has compressive surface stresses, with the inner layer having tensile stresses to compensate for the outer one. This makes the toughened glass gain resilient properties making them stronger and durable than regular glass.


2. What are the uses of toughened glass in construction?

Toughened glasses are used in,

1. Staircase & balcony railings.


Staircase railing.


2. Partition walls in the office, commercial & residential buildings.

3. Making glass doors without frames.

Glassdoor.


4. Glass cabin for bathroom showers, bathtubs, jacuzzi, etc.


5. Outer glass fittings for showrooms.

6. External glass facade in the buildings.

Glass facade.


7. Making shelves for bathrooms, kitchen, bedroom, etc.

Glass shelf.


3. What is the cost of toughened glasses having different thicknesses?

The cost of the toughened glass normally ranges from INR 60/- to INR 300/- per sqft., depending upon the thickness, quality, and glass manufacturing brand.

The toughened glasses are manufactured in a wide variety of thicknesses, ranging from 1mm to 50mm. according to their specific purpose.

But in the construction industry, the 8mm, 10mm & 12mm, thick glasses are widely used to suit the purpose.

The average market cost of these glasses are,

8mm     👉  INR 140/sqft.

10mm   👉  INR 170/sqft.

12mm   👉  INR 200/sqft.


4.   Is toughened glass unbreakable?

No. the toughened glasses are breakable.

Toughened glass with cracks.

The toughened glass does not break easily when compared to the normal annealed glasses used in the window frames. They are 4 times stronger than the regular glasses in restraining the applied pressure over them. But when they break (in rare cases), the fragmented toughened glass pieces form a pebble-like shape, having a curved blunt edge.


Broken toughened glass piece.

The shattered glass pieces are less harmful in causing the injuries, as they lack sharp edges.  


5. What are the advantages and disadvantages of toughened or tempered glass?

Advantages:

1. Toughened glass is 4 to 5 times stronger than regular glass to bear the impact loads.

2. These glasses do not require frames to hold them, as in the case of regular glasses.

3. If they break, there is less chance of injury, as they crumble like blunt pebbles.

4. Toughened glass provides an aesthetic and royal look to the buildings.

5. They create a good soundproof cabin for the office chairperson, having a look-through advantage.


Disadvantages:

1. Toughened glass cannot be cut or molded once they leave the factory. The glass dimensions, any openings, or drills to be given in the glass are pre-fixed.

2. They are costlier when compared to regular glass.


6. What is the procedure to be followed, to work with the toughened glass in construction?

The biggest disadvantage of the toughened glass is that all the dimensions are preset. We cannot cut & alter the manufactured glass size as per the required site conditions.


As you can observe in the above fig., the holes for the screwing the fixtures for toughened glass door are pre-arranged in the factories. You cannot drill a hole for the screwing purpose with the drilling tools on the working site. 


Working procedure:

We have to take the required measurements accurately by marking all the drills and openings for the accessory fittings. The regular glass of required thickness is brought to the workplace and the cutting line is marked over the glass by placing them in the in-situ position. The positioning of all the fitting accessories like handles, hinges, knobs, etc. is marked over the glass. The drill holes for screwing the fixtures should be marked with greater accuracy. After the completion of site work, the regular glass is transported to the factory, where the toughened glass is made.

The cutting, drilling, chamfering of the edges, and any such works are done over the marked regular glass accurately. Once all such processes are completed, the glass is tempered by heat treatment to create a toughened glass of a given dimension.

You can create a dummy model piece by using the plywood or hardboard, by actually doing the drilling and cutting work over them.  The sample piece so produced, can be given for the creation of a replica in toughened glass, to work with.

For more such explanatory articles, click here.

Thank you for going through this article. Have a good day 😄.


Share:

What is anti-slip bathroom shower mat?/ What is anti-skid PVC floor mat?

 1. What is an anti-slip bathroom shower mat?


These are the mats made of PVC or silicon material, having a wave-patterned surface texture, to provide a robust grip to your foot from slipping in the watery floor areas.

The PVC  ribbons are attached with rubber strips or pads over the back surface to make a stronghold with the floor surface.

Some varieties of anti-slip shower mats come with round suction cups at the back surface for firm grip, and equidistance circular openings to drain out the water.


round suction cup in the mat.


2. Where we can use the anti-skid floor mats?

As the name suggests, in all those watery areas where there is a chance of slipping, you can use these anti-skid floor mats.

The common areas are,

1. In the bathroom, especially beneath the shower.

Mat in the shower floor.


2. On the floor area of the kitchen sink, where you have to stand for cleaning the utensils.

3. Entry point of the toilet.

4. In the washing and changing room of the swimming pool.

5. In the dressing or changing room of the gym.

6. On the periphery of the swimming pool where we walk around. 

7. The floor beneath the washbasin in the residential or commercial buildings.


3. What are the different sizes of the anti-slip shower mats?

Anti-skid floor mats are usually available in rectangular or roll form having varied dimensions according to their usage.

1. The standard size of a rectangular mat is 61cm × 45cm ( 24" × 18" )

   Weight - 1.4kg.

The other sizes of the mat are 38cm × 70cm, 100cm × 40cm, 80cm × 48cm, etc. 

2. The standard size of a roll mat is 61cm × 300cm. 


 4. What are the advantages of anti-skid floor mats?

1. Protects you & your family from slipping in the watery floor area.

2. Anti-slip mat gives a better look to your home interior & bathroom.

3. Anti-skid floor mats can be easily washed & they dry out very quickly.

For more such explanatory articles, click here.

Thank you for going through this article. Have a good day 😄.


Share:

Translate

Blog Archive

popular posts

Recent Posts

Google search