All about civil construction knowledge- PARAM VISIONS

How to calculate the cutting length of spiral stirrups(ring). / Calculating the cutting length of helical ring( stirrup ) for pile.

If you are looking for a readymade calculator for helical stirrups, then click here.

 For the calculation procedure, go through the following steps.👇

The front view and cut section-AA of the pile are shown below so that you will clearly understand the calculation procedure of the spiral stirrup.


When we observe the spiral or helical stirrups in 3D,  it looks like a spring as shown below.


The cutting length of the spiral stirrup is given by the formula

=n√C2 + P2

Here, n = number of turns of the helical stirrup ( no. of the pitch in total pile length ).

         C = circumference of the helical stirrup.

         P = pitch of the helical stirrup.

Now, let us redraw the above diagram with mathematical values for the calculation purpose.


Given data:

Length of pile = 18m.

Diameter of pile = 750mm = 0.75m

Clear cover = 50mm =0.05m

Pitch = 150 mm. = 0.15m

The diameter of helical stirrup bar = 8mm.= 0.008m.


1. Number of turns ( n ):

    n  = [( length of pile ÷ pitch ) + no. of closure rings] 

       =  [ (18m ÷ 0.15m ) + 2 ]

      = 120 + 2

      = 122 nos.

Note: Here, no 2 i.e. added denotes the closure rings at the top & bottom of the helical stirrup as shown in the 1st drawing. 


2. Circumference of the helical stirrup ( C ):

      C = πD or 2πr

Here,

     r = [(diameter of pile ) - ( 2 nos. × clear cover ) - (2 × 1/2 × diameter of the spiral stirrup bar )]  ÷ 2

    r = [(750mm ) - ( 2nos. × 50mm ) - (2 × 1/2 × 8mm )]  ÷ 2

         = [750mm - 100mm -8mm]  ÷ 2

         = [642mm]  ÷ 2

         = 321mm. 

       r = 0.321m.

Circumference of the helical stirrup

  C = 2πr

      = [2 × 3.142 × 0.321 m.]

  C = 2.017 m.


The cutting length of the helical stirrup or spiral stirrup 

   = n√C2 + P2

   = 122 × 2.0172 + 0.152

  = 122 ×  4.068 + 0.0225

 = 122 × 4.091

 = 122 × 2.023

 = 246.76m


To get the exact cutting length of the spiral stirrup bars, we have to add lap length, as the length of an individual bar is limited to 12m.

Let us provide a lap length of 50d, where d = diameter of the helical bar.


Number of lapping required

 = [Calculated length of the helical bar ÷ length of a single bar.]

 = [246.76m ÷ 12m]

 = 20.56 say 21nos.


Go through the article👇

👀. Calculating the volume of concrete in a triangular pile cap having 3-piles


Total length of the helical stirrup bar required in a pile

 = [ calculated cutting length of the bar + ( no. of lapping × lap length )]

= [246.76m. + ( 21 nos. × 50d )]

= [246.76m. + ( 21 × 50 × 0.008m. ) ]

= [246.76m. + 8.4m.]

= 255.16m.


Go through the article👇

👀. Why do we have to break pile head after casting?/ Reason for breaking the pile head till cutoff level.

  For BBS & cutting length of all types of structural members, click here.  

If you have any quarries, you can ask me in the comment box👇.

Thank you for going through this calculation procedure. Have a good day😄


Share:

How to calculate the cutting length of a circular stirrup?/ Cutting length of the circular lateral ties.

 If you are looking for a readymade calculator for circular stirrups, then click here.

 For the calculation procedure, go through the following steps.👇


Now, let us calculate the cutting length of the circular stirrup for the below-given drawing.


Given data:

Diameter of circular column D = 450mm.

Clear cover = 40mm.

The diameter of stirrup d = 8mm.


The cutting length of the circular stirrup 

= [2πr + ( 2nos. × hook length ) - ( 2nos. × hook bend. ) ]

= [ 2πr +( 2nos. × 10d ) - ( 2nos. × 2d )


Here,

d = diameter of the stirrup.

 r = radius of the centerline of the circular stirrup ( as shown in the drawing).


First, we will calulate the value of r from the given data.

r = [ (1/2 × diameter of column ) -  clear cover - ( 1/2 × diameter of stirrup bar )]

r =  [ (1/2 × 450mm ) - 40mm - ( 1/2 × 8mm ) ]

r = [ 225mm - 40mm - 4mm ]

 r = 181mm.


The cutting length of the circular stirrup

= [ ( 2 × π × 181mm ) + ( 2nos × 10d ) - ( 2nos. × 2d ) ]

= [ ( 2 × 3.142 × 181mm ) + ( 2nos. × 10 × 8mm ) - ( 2nos. × 2 × 8mm. )]

= [ 1137.4 mm + 160mm - 32mm ]

= 1265.404mm

= 1.265m.


Thank you for going through this calculation. Have a good day😄


Share:

What is lap length in reinforcement bars?/ General rules while providing lap length.

Let us go through some of the FAQs to gain basic knowledge of the lap length or lap splice of the reinforcement bars.


 1. What is lap length?


The minimum length that should be provided when we overlap two reinforcement bars ( rebars ) so that the tension force & designed loads are transferred safely at the joints from one bar to another.

Lap length is also known as lap splice.


2. Why we provide lap length for rebars?


The maximum length of the reinforcement bars is limited to 12.2m ( or 40 ft.). This limited standard length is to facilitate the smooth manufacturing process and to avoid rebar transportation problems.

When we construct the multistorey buildings, the length of the single bar is insufficient to reach the top building height from the footing level. So, providing a lap length becomes necessary for the safe transfer of the load.


3. What happens if we don't provide sufficient lap length?

Cracks in RCC structure.


The provision of specified lap length is a must for the reinforcement bars to keep the structure intact in all types of load conditions. The RCC structure may develop cracks due to the splitting of rebars at the insufficient lap length zones. This ultimately leads to the failure of the structural member as the load transfer mechanism fails when the rebars of insufficient lap length cannot bear the superimposed load over the structure. 


4. What are the general rules while providing lap length?

1. Lapping should be provided alternately in a staggered pattern so that the lapping zone will not fall at the same level. This rule helps to avoid buckling of the structure.


2. The bars should be staggered with not more than 50% of bars in any section of the lapping zone. The minimum clear distance between the lapped rebars shall be 0.25 times the lap length.

3.  In any case, the staggering distance between the lapping of bars should not be less than 75mm.in any type of bars and structures.

4. When the bars of different diameters are lapped, the lap length is calculated for the smaller diameter bar.

5.For the bars whose diameter is greater or equal to 36mm., lapping should not be done. Instead of lapping, these bars should be welded. If welding is not possible, then you can lap these bars with an additional spiral of 6mm bar at the splice length.

 6. The stirrups (lateral ties ) should be closely placed at the lapping portion of the rebar.


 7. For flexural tension, Ld or 30d whichever is greater is considered.

 8. For direct tension, 2Ld or 30d whichever is greater is considered.

 9. The straight length of the lapping bars in the tension zone should not be less than 15d or 20cm.

 10. In the case of compression, the lap length should be equal to the Ld calculated in compression, but in any case not less than 24d.


To get the answer to all types of your construction queries,

Click 👀.  Terms & definition.


5. What is the main function of lapping in the RCC structures?

1. Lapping helps to provide continuity to the reinforcement bars in all types of RCC structures.

2. Lapping is needed to safely transfer the loads (or stress) from one reinforcement bar to another.

3. Lapping helps to design the RCC structures with the required strength.


Share:

How to calculate the volume of concrete in trapezoidal footing? /Trapezoidal footing volume calculation.

Let us calculate the volume of concrete in a trapezoidal footing as shown below.


The volume of the trapezoidal footing is calculated into 2 parts as it is made of two different shapes.

Part-1 of the footing is known as a truncated pyramid ( as shown below )


and part 2 of the footing is known as cuboid ( as shown below )


The volume of the trapezoidal footing 

   = [ (volume of the truncated pyramid ) + ( volume of the cuboid.) ]

   = [ ( 1/3(a1 +a2 + √ a1 × a2 ) × h )   + ( L × B × H ) ]

Here,

        a1 =  top surface area of a truncated pyramid ( part-1 )

             = l × b

      a 2 = base surface area of a truncated pyramid ( part-1 )

            = L × B 


Now, for calculation purpose, let us redraw the above drawings with mathematical dimensions. 


a. The volume of the cuboid ( part-2 ) :


Cuboid


Given data :

 Length L = 750mm.

Breadth B = 600mm.

Height H = 300 mm.


The volume of the cuboid 

   =  [L × B × H]

   = [750mm × 600mm × 300mm]

   = [0.75 m × 0.6m × 0.3m]

   =0.135 cum.


b. The volume of the truncated pyramid ( part-1 ) :


 Given data :

Base surface length L = 750mm ( same as cuboid )

Base surface breadth B = 600 mm. ( same as cuboid )

Top surface length l = 450 mm

Top surface breadth b = 300mm.

Height h = 200mm.


The volume of the truncated pyramid (part-1 )

  = [1/3(a1 +a2 + √ a1 × a2 ) × h]

Here,

    a1 = l × b

        = 450mm × 300mm

        = 0.45 m × 0.3 m

       = 0.135 sqm.


a2 = L × B

    = 750 mm × 600mm

   = 0.75m × 0.6 m

  = 0.45 sqm.

The volume of the truncated pyramid ( part -1)

  = 1/3 (0.135 sqm + 0.45 sqm + √ 0.135sqm × 0.45sqm ) × 0.2 m

  = 1/3 ( 0.585  +  √ 0.06075 ) × 0.2

  = 1/3 (0.585 + 0.2465 ) × 0.2

 = 1/3 × 0.8315 × 0.2

 = 0.0554 cum.


The volume of concrete in trapezoidal footing 

  = vol. of cuboid ( part-2 ) + vol. of truncated pyramid ( part-1 )

  = 0.135 cum + 0.0554 cum

  = 0.1904 cum.

  =6.725 cu ft.  ( 1 cu ft = 35.315 cum )

 To go through the articles on Estimation & calculation in civil engineering, click here.

Thank you for going through these calculation steps. Have a good day 😄.


Share:

How to calculate the quantity of paint for a room or building. / Calculating the quantity of paint required for a room in liters.

 Let us consider a room of size 14 ft. ×16 ft. having 10 ft. height as shown in the drawing. 

 Here, I have shown the sectional view, by removing the front wall of the room. Let us include that cut wall for the calculation purpose.


Given data:

Front & back walls of dimension = 14 ft.× 10 ft.

Two sidewalls of dimension = 16 ft.× 10 ft.

Ceiling of dimension =  14ft. × 16 ft.

One door of size =  2.5 ft. × 7.0 ft.

One window of size = 3.0 ft × 4.0 ft.


Let us paint this room with a Tractor emulsion of Asian paints. 

The coverage of Tractor emulsion as mentioned by the company is

    Single coat = 260 - 300 sqft. / litre.

    Double coat =130 - 150 sqft / litre.


Calculation:

First, we will calculate the total area of the room that should be painted with Tractor emulsion.

Total painting area of the room

=[{ area of walls} + {area of ceiling } - {area of doors and windows} ]

=[{ 2nos.× side walls + 2nos.× front & back wall} + {1no.× ceiling } - {1no.× door +1no.× window} ] 

=[{2 nos.× 16ft.× 10ft. + 2nos. × 14ft. × 10ft.} + {14ft. × 16ft.} -{2.5ft. × 7ft.+ 3ft. × 4ft.}]

= [ { 320 sqft. + 280 sqft.} + { 224 sqft. } - {17.5 sqft. + 12 sqft.}]

= [ 600 sqft. + 224 sqft. - 29.5 sqft.]

= 824 sqft - 29.5 sqft.

= 794.5 sq ft.


The total quantity of paint required

= [total painting area ÷ paint coverage per liter.]

For a single coat of paintwork

= [794.5 sqft ÷ 260 sqft.]

= 3.05 litres.


For the double coat of painting work

= [794.5 sqft. ÷ 130 sqft]

= 6.11 litres.

Note:

1. If you want to calculate the quantity of paint for a building, you have to sum up the total area of the rooms after calculating them individually.

2. After calculating the painting area, check out the coverage area of the specific paint as mentioned by the company.

3. Take the lowest figure of paint coverage area data ( as I did ), so that extra paint if remains will be useful in touchup work after completing the painting job. 

4. There are so many varieties of paints available in the market having their own coverage limit. So, to get the practical results, you count on the coverage of the particular paint that you have chosen, & use that data for the calculation.

To go through all types of quantity estimate articles, click here.

Thank you for going through these calculation steps. Have a good day 😄.

Share:

How to store cement in the construction site?/ Basic guidelines for the storage of cement.

Let us go through some of the queries, that cover the guidelines & procedures to follow while storing the cement bags on the construction site.


1. What are the points to be considered while storing cement?


1. The cement should be kept in a leak-proof and seepage-proof storeroom.

2. The storeroom should be free from dampness & should be kept dry.

3. Doors & windows of the room should be kept closed & they should not contain any partial openings or holes in them.

4. The stored cement should be covered entirely with plastic sheets or tarpaulins.

5. The cement that comes in paper bags should be kept separately from the cement that is filled in HDPE bags. 

6. The cement should be used on a first come first serve basis.


2. Why do we have to follow some basic guidelines while storing cement?

Cement is a hygroscopic product. That means it absorbs moisture from the atmosphere and undergoes a chemical reaction known as hydration. The reacted cement turns into a hardened mass or you may observe stone-like cement lumps scattered within all parts of the bag where the reaction takes place.

To ensure the quality and safety of the concrete structure, it becomes necessary to follow some guidelines, so that the stored cement remains intact without any compromise in its quality.


3. How to stack cement on the construction site?


1. The cement should be stacked on the wooden plank, which should be at least 6 inches above the floor level.

2. The wooden plank should be covered with tarpaulin or plastic sheets before stacking the cement.

3. The distance between the cement bags and the nearest wall should be at least one foot from each other.

4.  The stack should not be more than 10 cement bags in height.

5. The width of the stacked cement bags should not be more than 10ft. ( 3m ) or 4 bags in length.

6. To prevent air circulation, there should not be any gaps or voids in between the stacked rows & columns of the bags.

7. Prevent unloading & lifting of the cement bags by hooks to keep them moisture-proof.


4. What is the shelf life of cement?

The shelf life of cement is 3 months from the date of manufacture.


5. How to check the quality of cement?


The cement bag comes with all the printed details like Manufactured date, MRP of the bag, Brand name, ISI mark, Grade & type of cement, etc. as shown above. You have to check all these details to ensure the quality of the cement before buying them.

Go through the article 👇

👀.  What are the points to be checked before buying cement?

For all such articles over useful tipsclick here.

Thank you for going through this article. Have a good day 😄.

Thank you for going through this article. Have a good day 😄.

Share:

What is main bars & distribution bars in a slab? / Difference between main bars and distribution bars in a slab.

 Let us go through some of the FAQs to understand the main bars & distribution bars in a slab.

1. What are the main bars in a slab?


The reinforcement bars that are placed in the tension zone of the slab to resist the bending moment & to transfer the superimposed loads to the supports that are provided for the slab are called main bars.

 Main bars are always placed at the bottom part of the slab reinforcement and distribution bars rest over the main bar as shown in the above drawing.

The diameter of the main bar should not be less than 8mm for the HYSD bar and 10mm for plain bars.


2. What are the distribution bars in a slab?

The reinforcement bars that are placed above the main bar in a one-way slab, to distribute the superimposed load to the main bar are called distribution bars. 


As you can observe in the above drawing, distribution bars are provided in the longer span of the one-way slab & main bars are placed along the shorter span of the slab.

The distribution bar helps to firmly hold the main bars in their assigned position. They also act against shrinkage stresses due to temperature variations. 

3. Is distribution bars provided in a two-way slab?


 The term distribution bar is sometimes used for the top reinforcement of all types of slabs. But in actuality, it is not correct in the case of a two-way slab as the load is transferred in both directions. So in the two-way slabs, the reinforcement provided in both the Lx & Ly directions should be called main bars. 

4. What are the different functions of main bars in concrete?

1. To transfer the superimposed loads to the supports. 

2. To resist the bending moments.

3. To withstand shear stress in the tension zone.

4. To encounter shrinkage cracks due to temperature variation.


5. What are the different functions of distribution bars in concrete?

1. To distribute the superimposed load to the main bar.

2. To firmly hold the main bars in their given position.

3. To form a mesh with the main bar in concrete for better bonding strength.

4. To resist shrinkage stress due to climatic variation.

5. To resist the development of cracks due to external factors.


6. What are the differences between main bars & distribution bars in a slab?


No.

Main bar

Distribution bar

1.

Used in shorter

direction.


Used in longer

direction of

one-way slab.


2.

Placed in bottom

part of slab

reinforcement.

Placed over the

top of the main

bar.

3.

Higher diameter  

bars are used.


Lower diameter

bars are used.

4.

Designed to

resist bending     

moment.

Not designed to

resist bending

moment.

5.

Transfers super

imposed load to  

the supports

Distributes super

imposed load to

the main bar.

6.

Resists shear stress

at the tension

zone.

Resists shrinkage

stress due to

climatic variation.


 To go through the comparison & difference between the several types of building materials & construction costs, click here.

Thank you for going through this article. Have a good day😄

Share:

Causes or reasons for cracks in concrete slab./ Why concrete slab cracks?

 Now, let us go through different reasons or causes that create a crack in a concrete slab.


1. Improper concrete mix:

While concreting a slab, we should strictly adhere to the specified mix design for that particular slab. To maintain the quality of the concrete mix, it is advisable to prepare the concrete with weigh batching, rather than volumetric batching. Using ghamela (mortar pan ) instead of the batch box in volumetric batching results in the concrete of inferior grade.


2. Rebar cover:


We have to use spacer blocks or cover blocks to provide the specified covers to the slab reinforcement at a required spacing ( as per the IS code ). Improper & inadequate covering of the rebar leads to the sagging of the rebars resulting in crack development when the concrete hardens.

Note: I have seen some contractors using waste tile pieces as slab covers. Don't do such mistakes as it is improper & non-technical.   


3. Excess vibration:

Concrete vibration always needs a skilled worker to run the process. We have to use a specified immersion needle for the concrete work, as the needles are available in different sizes targeting different types of concrete structures. 

Excess vibration surpassing its time limit leads to segregation & concrete bleeding. The weak pockets of concrete created due to excess vibration may cause cracks in the slabs at a later stage.


4. Improper w/c ratio:

Maintaining a  specified w/c ratio is a must for all types of concrete works. Improper w/c ratio is also one of the main culprits in concrete segregation and bleeding.


5. Excess heat:


Excess atmospheric heat evaporates the water within the concrete too quickly, resulting in dehydration.  Water evaporation helps in the development of surface cracks in the slab due to shrinkage. The temperature should be within 35°c. & not less than 5°c to avoid such cracks. 


6. Bar spacing:

 Spacing in main & distribution bars has certain limitations as mentioned in the IS CODES. Excess spacing between the two rebars creates micro-cracks in the concrete surface.


7. Low compaction:

At the junction point of the column, beam, and slab, it becomes difficult to run the vibrator due to overcrowded bars. Special care should be taken in such junction points, so that concrete poured is workable. Low compaction creates voids in the concrete body, that may develop cracks in the near future. 


8. Formwork settlement:


If the formworks of the particular slab part settle down due to the dead load of the concrete, it may create line cracks in such junctions due to shear. Formwork props and supports should be rested over the hard surface area to avoid such settlement.


9. Early de-shuttering:

All type of concrete structures has their own formwork de-shuttering period to follow with. Premature de-shuttering may cause cracks in slabs, as the concrete lacks the final setting strength to sustain the load.


10. Improper curing:


Curing is an essential part of concrete work to complete the hydration process in a proper way. Improper curing may create concrete having below normal design strength. This may cause cracks when the slab is ponded with an extra live load.


11. Grade of cement:

The grade and type of cement should be known before using them in the slab concreting. The cement older than 3 months should be avoided and it is advisable to use a truckload of fresh cement directly transported from the factory to the slab concreting site.


12. Raw material quality:

Lab & field test is a must for the sand, coarse aggregates, and cement to know their quality beforehand. Using sand of heavy silt content or improper-sized coarse aggregate may cause cracks in the slab sooner or later.


13. Rebar quality:


TMT or TMX bars of specified grade are preferred over other types of bars as they are more construction-friendly in all aspects. Rebars should be free of rust or surface flakes to avoid any cracks in the slab structure.


14. Structural design:

We design the concrete structures for the specific load conditions with safety factors. But any mistakes in the calculation of the number of rebars and their spacing while designing may lead to cracks at such slab parts.


15. Binding wire tye:

It is advisable to cut the leftover extra binding wire after the tying process. Protrusion of such binding wire end above the concrete surface may cause water seepage and may help in the formation of micro-cracks in concrete.


16. Concealed pipes:


Sometimes, the electrical conduits used in the concealed wiring invade the concrete cover area in slabs. Concealed materials should be checked before pouring the concrete, to avoid the formation of cracks in line with conduits.


17. Loose formworks:

Care should be taken to plug all the minute openings in the formworks before slab concreting. The openings may leak cement slurry while vibrating the concrete, resulting in lower-grade concrete. This inferior concrete surface area then becomes a hotspot to invite cracks.


18. Gaping in concrete timing:

All the slab concrete works should be completed on that particular day to have a solid one-piece seamless concrete mass. The concrete should be poured continuously, before the initial setting time of prior concrete joints. Always you have to start the work from one end and care should be taken that, concrete should not be partially filled in any formwork to exceed the initial setting time.  

To get the answer to more such construction-related FAQs, click here.

Thank you for going through this article. Have a good day😄

Share:

Calculating the area of irregular shaped (5 side) land or plot or site./ Area calculation for the irregular pentagon-shaped land.( part- 3 )

 If you are looking for a readymade calculator for type-5 land, then click here.

 For the calculation procedure, go through the following steps.👇

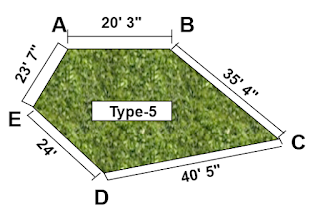
Now, let us go through irregularly shaped land or plot, having 5 sides, and let us calculate the area of this plot, by using mathematical formulas.


Type - 5:

Here, all 5 sides of the land are unequal in length & are not parallel to each other.

Given data:

Side AB = 20' 3" = 20.25 ft.

Side BC = 35' 4" = 35.333 ft.

Side CD = 40' 5" = 40.416 ft.

Side DE = 24'      = 24.0 ft.

Side EA = 23' 7" = 23.583 ft.


Note:

 1. For your understanding, all the dimensions of the type-5 drawing are taken in ft. & in the first 4 types of land drawing, we have taken meters as a measuring unit.

2. We have converted all the land measurements into ft. by dividing inches by 12 (1 ft.=12 inch).

To calculate the area of 5-sided or pentagon-shaped land, we have to practically measure the distance between AD, & BD as shown in the above drawing.

Side AD = 40' 2" = 40.166 ft. as measured on-site.

Side BD = 43' 4" = 43. 333 ft. as measured on-site.

Note: You can measure the distance between AD & BD by plotting the land drawing on a proportionate scale, but the result may not be that accurate.


Now, we will calculate the area of triangle ADE, triangle ABD, & triangle BCD separately.

We will use Heron's formula to calculate the areas.


1.  Area of triangle ADE

= √ s (s - a ) ( s - b ) ( s - c )

Here, s is the semi-perimeter of the triangle 

i.e. s = [(a + b + c) / 2]

 a, b, and c are the 3 sides of the triangle.

By data input

s = [(side EA + side DE + side AD) / 2]

   = [(23.583 + 24 + 40.166) / 2]

   = [87.749 / 2]

   = 43.874 ft.


Area of triangle ADE

 = [√ 43.874 ( 43.874 - 23.583) ( 43.874 - 24 ) ( 43.874 - 40.166 )]

 = [√ 43.874 ( 20.291 ) ( 19.874 ) ( 3.708 )]

= [√ 65,604.812]

= 256.134 sqft.


 2.  Similarly, the area of triangle ABD

      = √ s (s - a ) ( s - b ) ( s - c )

s = [(side AB + side BD + side AD) / 2]

  = [(20.25 + 43.333 + 40.166) /2]

  = [103.749/ 2]

  = 51.874 ft.


Area of triangle ABD 

=  [√ 51.874 ( 51.874 - 20.25) ( 51.874 - 43.333 ) ( 51.874 - 40.166 )]

=  [√ 51.874 × 31.624 × 8.541 × 11.708]

=  [√ 164,043.103]

= 405.022 sqft.   


 3.  Area of triangle BCD

= √ s (s - a ) ( s - b ) ( s - c )

s = [(side BC + side CD + side BD) / 2]

   = [(35.333 + 40.416 + 43.333) /2]

   = [119.082/ 2]

   = 59.541 ft.


Area of triangle BCD 

   =  [√ 59.541 ( 59.541 - 35.333) ( 59.541 - 40.416 ) ( 59.541 - 43.333 )]

   =  [√ 59.541 × 24.208 × 19.125 × 16.208]

   =  [√ 446,792.534]

    = 668.425 sqft.


Now, the total area of land ABCDE

= [Area of triangle ADE + area of triangle ABD + area of triangle BCD]

=  [256.134 sqft. + 405.022 sqft. + 668.425 sqft.]

 = 1329.581 sqft.


Note: 

By using Heron's formula, you can calculate the area of all types of irregular-shaped land or plots having an 'n' number of sides.

    Back 👈 Part-2


Thank you for going through this calculation. Have a good day😄


Share:

Calculating the area of irregular shaped land or plot or site./ Area calculation for the irregular shaped land.( part- 2 )

 If you are looking for a readymade calculator for type-4 land, then click here.

 For the calculation procedure, go through the following steps.👇


 Back 👈 Part-1 

Now, let us go through some of the possible irregular shapes of the land or plot, and let us calculate the area of those plots, by using mathematical formulas.

Type 3:

Here, side AD & side BC are parallel to each other having the same length.

Given data :

 Side AD (a ) = side BC =  10 m. 

   Side AB = side DC = 7m.

   Side AD & BC of the land are parallel to each other.

The perpendicular distance between the side AD & BC ( h ) = 6m.


The area of the land is calculated by the formula

= [ a × h]

= [side AD or side BC  × Perpendicular distance]

= [10m × 6m]

 60 sqm.


Note:

1. The formula should be used only when the two sides of the land are parallel to each other having the same length.

2.  The perpendicular distance between the two parallel sides, i.e. h can be measured directly on-plot, if not known.


Type 4:

Here, all four sides of the land are unequal in length and are not parallel to each other.

Given data :

 Side AD  = 11m.

 Side BC =  10 m. 

  Side AB =7m.

 Side DC = 6.7m.

   All four sides are unequal and are not parallel to each other.


To calculate the area of land, we have to measure the distance AC as shown in the above drawing.

Side AC = 13.2m as measured on-site.

Now, we will calculate the area of triangle ABC & triangle ACD separately.

We will use Heron's formula to calculate the areas.


Area of triangle ABC

= √ s (s - a ) ( s - b ) ( s - c )

Here, s is the semi-perimeter of the triangle 

i.e. s = a + b + c / 2

 a, b, and c are the 3 sides of the triangle.

By data input

s = [(side AB + side BC + side AC) / 2]

   = [(7m + 10m + 13.2 m) ÷ 2]

  =  [30.2 m ÷ 2]

  = 15.1m.


Area of triangle ABC

 = [√ 15.1 ( 15.1 - 7 ) ( 15.1 - 10 ) ( 15.1 - 13.2 )]

 = [√ 15.1 ( 8.1 ) ( 5.1 ) ( 1.9 )]

= [√ 1185.184]

=34.426 sqm.


Similarly, the area of triangle ACD

= [√ s (s - a ) ( s - b ) ( s - c )]

s = [(side AD + side DC + side AC) / 2]

  = [(11m + 6.7m + 13.2 m) ÷2]

 =  [30.9 m.÷2]

 = 15.45 m.


Area of triangle ACD 

= [√  15.45 ( 15.45 - 11 ) ( 15.45 - 6.7 ) ( 15.45 - 13.2 )]

= [√ 15.45 × 4.45 × 8.75 × 2.25]

= [√ 1353.565]

= 36.79 sqm.


Area of the land ABCD 

 = [Area of triangle ABC + area of triangle ACD]

 = [34.426 sqm. + 36.79 sqm.]

  = 71.216 sqm.

          Back 👈 Part 1             Continued 👉 Part-3


Thank you for going through this calculation. Have a good day😄


Share:

How to calculate the area of irregular shaped land or plot?/ Irregular shape site area calculation.( part-1 )

If you are looking for a readymade calculator, then click here.

For the calculation procedure, go through the following steps.👇

Now, let us go through some of the possible irregular shapes of the land or plot, and let us calculate the area of those plots, by using mathematical formulas.

Type 1 :

Here, two sides AD & BC are parallel to each other and all 4 sides have different lengths.


Given data :

 Side AD (a ) =  16.105m. 

  Side BC (b ) = 10m.

   Side AB = 7m.

   Side CD = 6.5m.

Side AD & BC of the land are parallel to each other.

The perpendicular distance between the side AD & BC ( h ) = 6m.


The area of the land is calculated by the formula

= 1/2 × ( a + b ) × h

= 1/2 × (side AD + side BC ) × Perpendicular distance 

= 1/2 × ( 16.105m + 10m ) × 6m

= 1/2 ×  26.105 m ×6m

= 78.315 sqm.


Note:

1. The formula should be used only when the two sides of the land are parallel to each other.

2.  The perpendicular distance between the two parallel sides, i.e. h can be measured directly on-plot, if not known.


Type 2:

Here, two sides AD & BC are parallel to each other & side DC is perpendicular to these two parallel sides.


Given data:

  Side AD (a ) =  13.6m. 

  Side BC (b ) = 10m.

  Side AB = 7m.

  Side CD ( h)= 6m.

Side AD & BC of the land are parallel to each other.


The area of the land is calculated by the formula

= 1/2 × ( a + b ) × h

= 1/2 × (side AD + side BC ) × side DC

= 1/2 × ( 13.6m + 10m ) × 6m

= 1/2 ×  23.6 m ×6m

= 70.8 sqm.


Note:

1. The formula should be used only when the two sides of the land are parallel to each other.

2.  There is no need to measure the length of the perpendicular distance, as side DC  joins the two parallel sides at a 90° angle.


Go through the article👇

👀. Area calculation for the irregular pentagon-shaped land. ( part- 3 )


Alternate method:

Let us draw a perpendicular line joining the sides AD & BC  as shown in the above drawing.

Side BE = side DC = 6m as both are perpendicular to the two parallel sides of the land.

Side AE = side AD - side BC 

            = 13.6m - 10m 

            = 3.6m.

Let us now calculate the area of triangle AEB and the area of rectangle EDBC separately 

Area of triangle AEB

   = 1/2 × base × height

  = 1/2 × side AE × side EB

= 1/2 × 3.6m × 6m

= 10.8 sqm.


Area of rectangle EDBC.

Here, length = side ED or side BC = 10m

        breadth = side EB or side DC = 6m.

Area of rectangle

    = length × breadth

    = 10m × 6m

   = 60 sqm.

Now, the area of the land 

= area of triangle AFB + area of rectangle EDBC

= 10.8 sqm. + 60 sqm.

 = 70.8 sqm.

(The answer is the same as above.)

Similarly, you can calculate and confirm the area of type 1 by making two triangles & one rectangle in the first drawing.

If you have any queries, you can ask me in the comment section.

         Continued 👉 Part 2


Share:

Translate

Blog Archive

popular posts

Recent Posts

Google search