All about civil construction knowledge- PARAM VISIONS

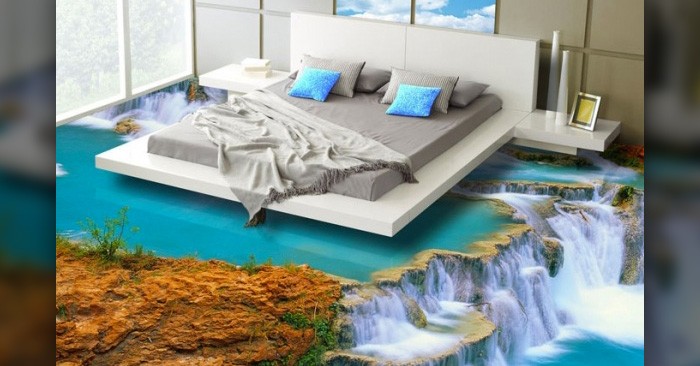
What is 3D epoxy flooring? - Their advantages & disadvantages. /3D flooring tiles.

3D epoxy flooring :


3d epoxy flooring/3D FLOORING TILES
3D epoxy flooring
      
Epoxy is a material that is made by mixing two different ingredients i.e. resins and hardeners in fixed proportions. 

In making 3D epoxy flooring, first, the substrate is cleaned thoroughly, by removing dirt, protrusions, etc. The base layer is made completely dry, as epoxy hates water since it hinders its performance. As per the room size, the 3D murals were prepared with a perfect fit, and placing the images were in the framework in such a way that they should come in the proper location of the room area. These murals were usually made up of vinyl (PVC) material.


3D - floor mural


They were glued to the substrate carefully so that there are no foldings over it and removing all the air bubbles entrapped inside to achieve an even surface.

The next day, the epoxy application work is carried out using rollers and a spatula. The thickness of the epoxy will be usually between 2mm to 5mm. Less than 2mm thickness is used only in epoxy coatings which are applied over the existing floor surfaces.

 It takes 24 hours for an initial curing period to become rock hard, which is usable after that period. The next day, polishing work will be carried out to have shiny mirror-like 3D flooring.

But the cost of these floorings was very high, which is 5 to 10 times higher than the normal stone and tile floorings. These rates vary as per the room size, floor thickness, type of mural used, brand, and the warranty provided by the company (contractor).


Advantages of 3D epoxy flooring :


1. You will get a seamless floor with a shiny mirror-like finish.

2.  Chemical resistant and waterproof.

3.  Hard, tough, and scratchproof.

4.  Aesthetic and royal in appearance.

5.  Easy to clean as there are no joints in between.

6. You can select a wide range of images with different colors, as per your choice.

7. They provide you with a single whole look creating an extra dimension in appearance.


Disadvantages:


1. The main disadvantage is its cost, which starts normally from INR 400/sq.ft.(in India)

2. Its availability is limited as compared to other types of floorings, as it needs skilled workers for measurement, mural preparation, and finishing.
Share:

Difference between foundation and footing/What is foundation and footing?

The words, foundation, and footing in civil engineering carry two different meanings, as per the area of specification and location.
Let us see both of them here.


Image result for building foundation
Building foundation Fig 1.

 Foundation: 


It is the part of the building structure, which is below the ground level, where all the loads of the superstructure are transferred. 
See fig. no. 1.

Image result for pile foundation
Pile foundation  Fig 2.
.


In other terms, all the deep foundations are simply called foundations. Examples are pile foundation, well foundation, caisson foundation, etc.
 See fig no. 2.


Footings:


Footings Fig 3.


It is the lowest part of the building foundation, which rests on subsoil, and distributes load to the ground. It may be made of any materials like concrete, rubble stone, bricks, etc. 

Fig.3 shows the footing below the ground level.

Image result for footings
Shallow foundation Fig 4.
.

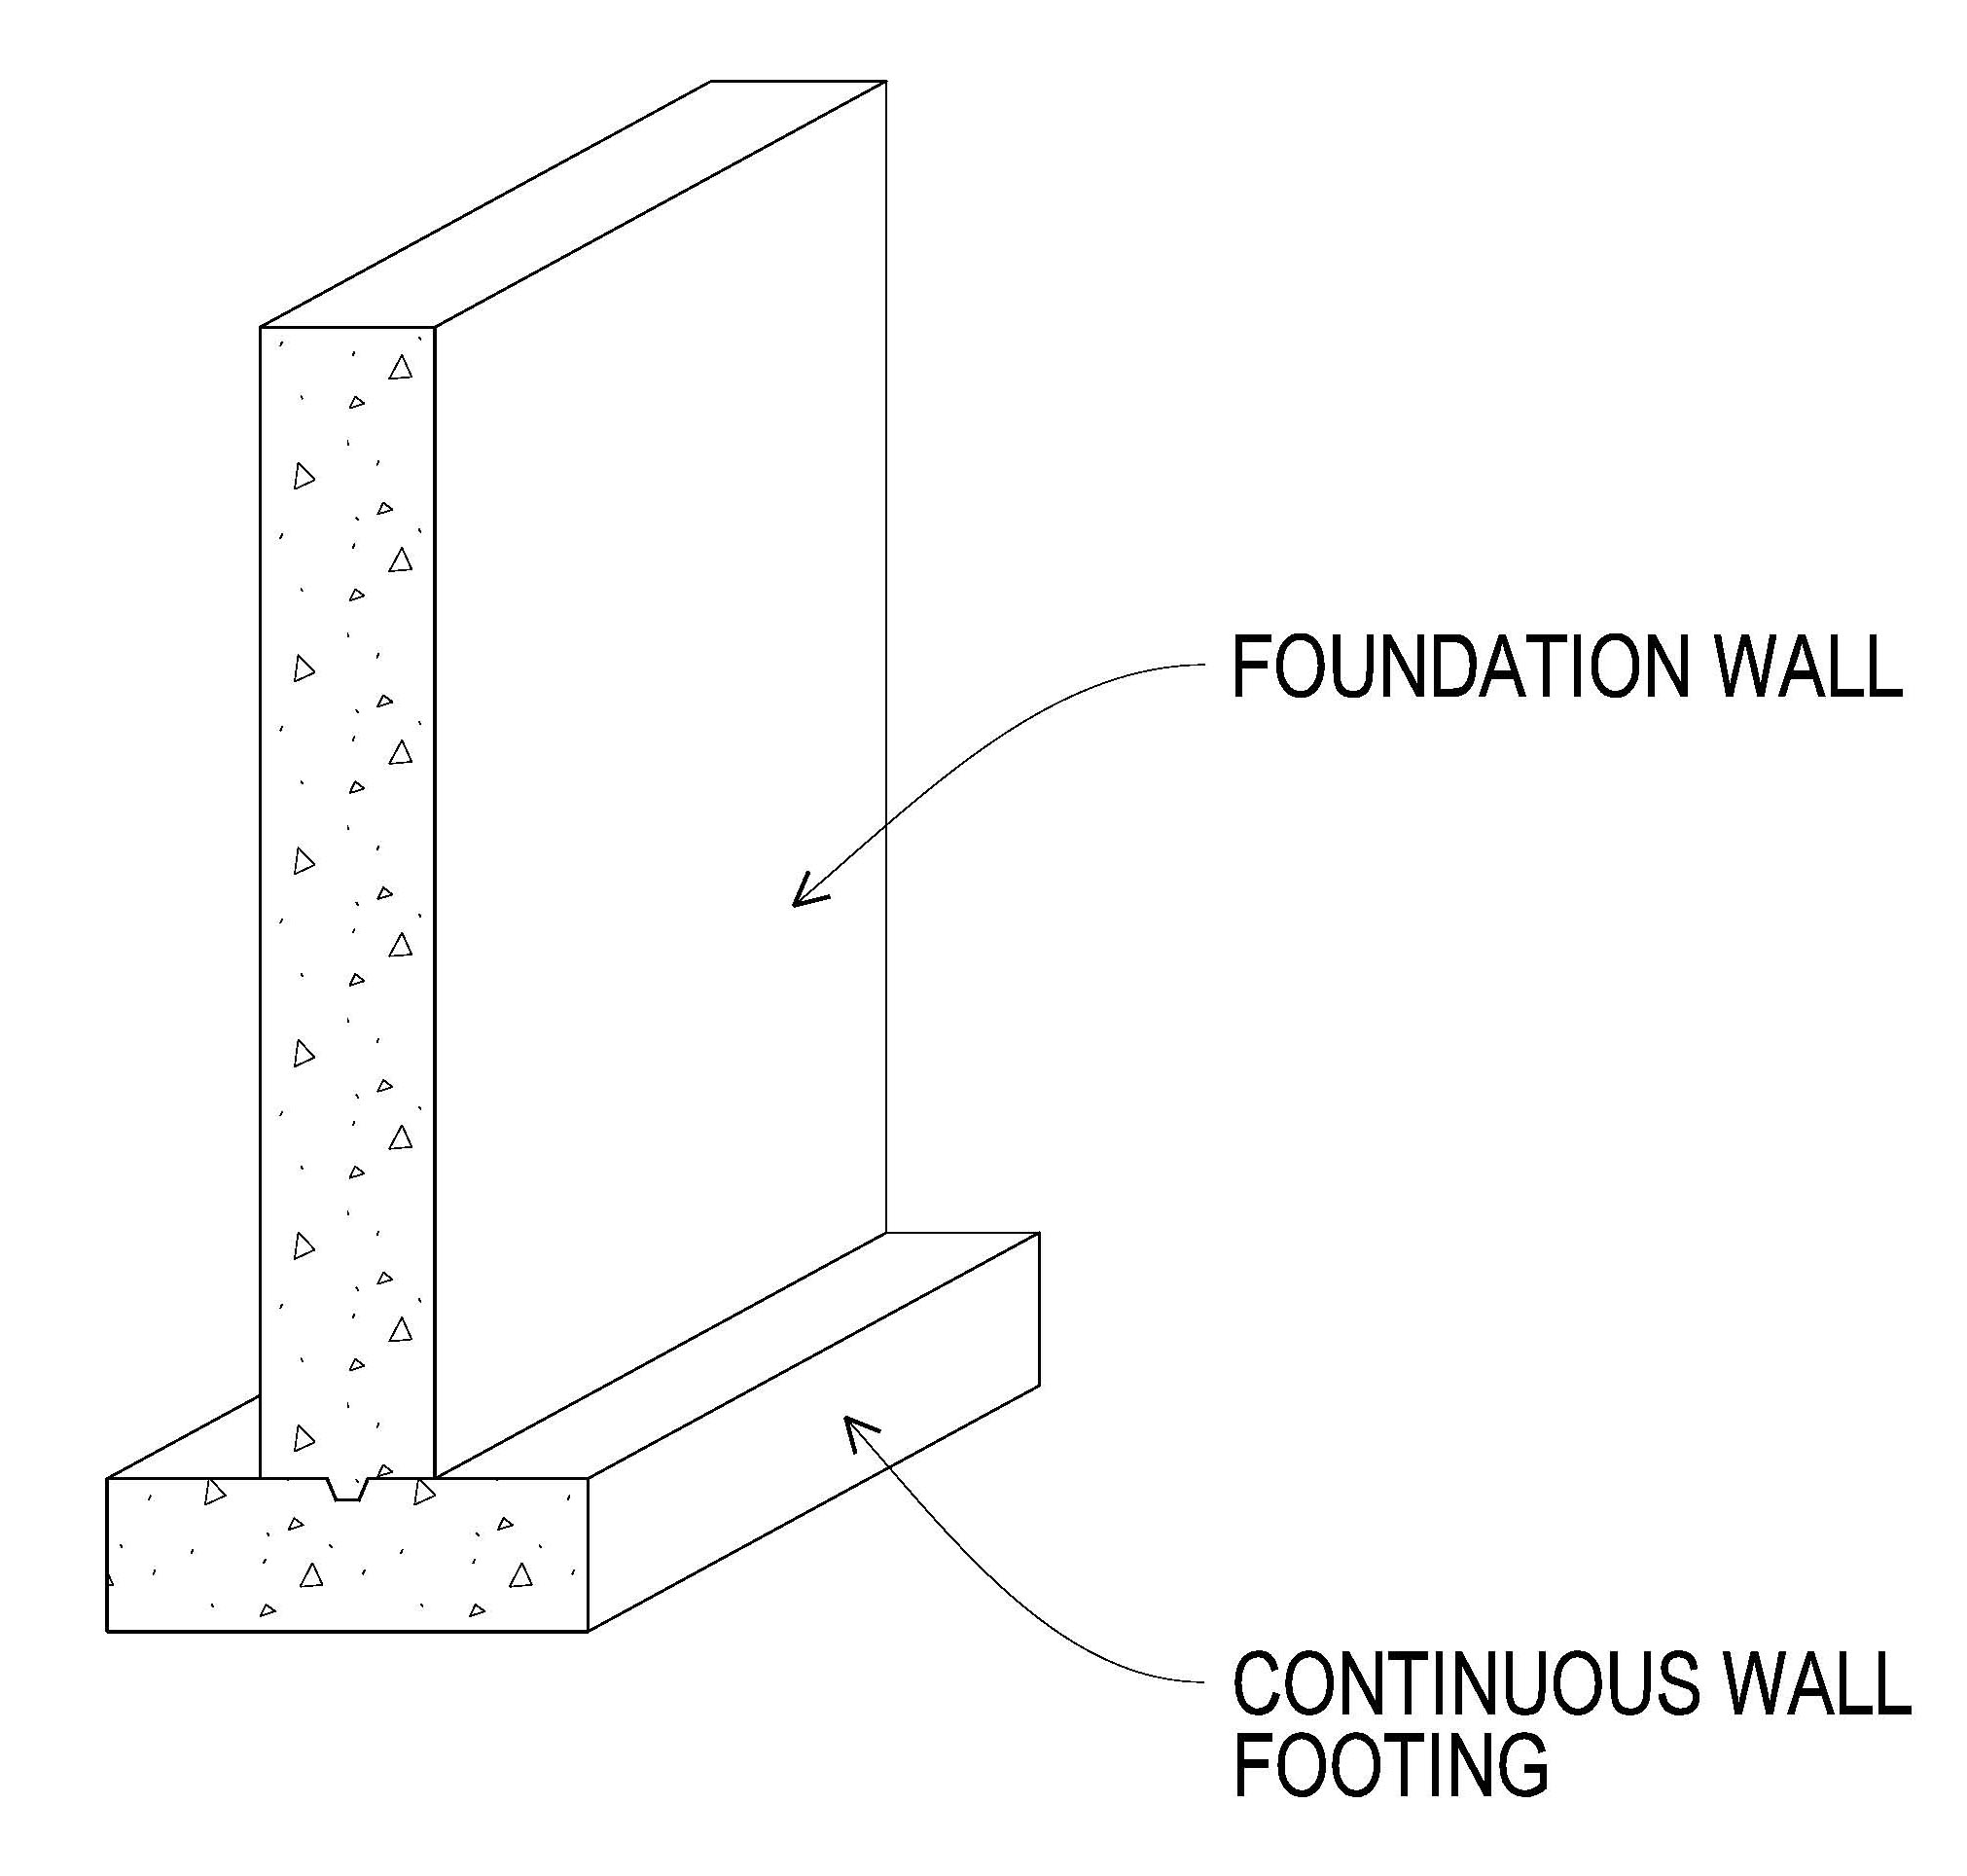
In other terms, all the shallow foundations are simply called footings. Examples are strap footing, combined footing, spread footing, continuous wall footing, etc.
see fig 4

I think the brief description with the embedded figures is enough to understand the difference between the two terminologies. 

Thank you for reading.

.
.

Share:

Types of paints used in civil engineering./Different types of paints used in buildings.

Let us look into different types of paints used in civil engineering/building construction.


Wall painting

 1. Enamel paint:

 It is an oil-based paint, having resinous matter, mostly composed of alkyd. After painting, they give a glossy finish, with a hard surface.

2. Oil paint:

 Different oils like tung oil, nut oil, linseed oil, etc were used as base material, with suspended pigment particles. This paint is mostly used on metal surfaces like grills, gates, railings, etc., and also on wooden materials.

3. Distemper paint

These paints are oil-based, and they are available in paste as well as in powder form. Chalk, lime, and colored pigments act as the main raw material in the manufacturing process. 

They are cheaper in comparison to other wall paints and less durable.

4. Emulsion paint:

 They are made up of a variety of chemical ingredients like binders, pigments, solvents, additives, etc. It is a suspension of globules of one liquid part with another liquid, where these two liquids do not mix with each other.

5. Whitewash:

 This is the low-cost paint, where slaked lime(calcium hydroxide) and chalk are used with water to form a solution. This mixture is mostly applied for whitening walls of less importance, or on rough surfaces.

6. Luminous paint:

 These are the paints that glow at night, for some extended period of time. It gives visible light through fluorescence.

7. Bituminous paint: 

This black-colored paint is made by dissolving bitumen or coal tar in a mineral spirit. They are mostly used for waterproofing or applied as a protective coat on surfaces of different materials.

8. Cement paint:

 The main ingredient used in this type of paint is cement, with some colored pigments and additives.

 This is a water-based paint, mostly applied for the exterior surface, as it is a good antifungal and waterproofing paint.

9. Epoxy paint:

 They are made up of acrylic resins and are used in coating the floors. It forms a glossy and hard surface upon application.

10. Anti-corrosive paint

These types of paints are mostly used as a protective coating against oxidation and corrosion, over steel or iron products.

11. Fungicidal paint

They are also known as anti-mold paints. As the name suggests, it is applied to prevent the growth of fungus or molds in the bathroom or in the kitchen.

12. Metallic paint:

 Metallic flakes are used as additives, which gives the sparkling look on the surface. They are used to apply over metallic surfaces.

13. Textured paint

It contains coarse grains, which create a rough uneven textured pattern on the wall upon application. They are used to beautify the wall with a natural look.

If you are self painter for the interior of your home or want to try it as a beginner, then you can start with Asian paints DIY self-painting kit. 

In this article, I have tried to cover, almost all the types of paints that are used in buildings /civil engineering.

To go through the articles related to the different types (classifications) of construction materials, click here.

 Thanks for reading😃, have a nice day.


Share:

Calculating the quantity of floor tiles for the building.

 For the calculation purpose, let us consider a room of size  12ft.×15ft.

 To calculate the number of tiles needed for this room, first,  we will calculate the area of this room.
 
Room area = L × B

                  = [12ft × 15 ft.]

                  = 180 sq.ft.


Flooring Tiles.


Now, we will consider floor tile of size = 30cm × 30cm 

  Area of one tile = l × b
                           = 30cm × 30cm 
                           = 900 sq.cm.

Since the area calculated for the room is in sq.ft., first we will convert the area of one tile into the same unit i.e. into sq. ft.

As you know, 1 sq ft. = 929.03 sq.cm.

Area of one tile in sqft.
              
                        = [900 ÷ 929.03 ]

                        = 0.969 sq.ft.

Now, the number of tiles needed 
                   
                          =  area of room ÷ area of one tile.
                         = 180 sq.ft ÷ 0.969 sq.ft
                      
                         = 185.75 say 186 nos. 

Now let us calculate the no. of tile boxes needed for this room.
Suppose if the no. of tiles in a box is 11 nos. (no. of floor tiles in a box varies as per the size, thickness, brand, etc)

Then, by dividing the  total  no. of tiles by the no. of tiles in a box, we get

                  [186 nos ÷ 11nos ]

                    = 16.9 Nos. say,   17 boxes.

 Alternate method:

 There is a simple method to calculate the no. of boxes required for a room.

After calculating the area of the room, you go to the shop, where you want to buy the tile. You will get the total area of the tile written on the box which it includes.

Simply divide the room area by the area mentioned on the box, and you will get the no. of the box needed to be purchased.

To go through all types of quantity estimate articles, click here.

Thank you for going through these calculation steps. Have a good day 😄.

                                           
Share:

What is window blinds and window shades?/ Difference between window blinds & window shades./Window blinds Vs. window shades.

Often there is confusion between the two terms, i.e. window blinds and shades. Both of these materials were used in the window coverings, but with slightly different functions.

 Let us see now, what they actually mean.

 Window blinds:


Window blinds


 They are usually made up of harder materials as compared to the materials used in the shades. They have slats(louvers) or vanes that are positioned either vertically or horizontally, one after another. They are held together by movable cords to form one whole frame of window blind as shown in the figure. These slats can be moved at different angles to control light and privacy as needed. They are operated manually by lever cords, and nowadays we get them with cordless technology.

Window shades:


Window shades


 They are made up of one piece of material, unlike blinds. Usually, the materials used were fabric, vinyl, woven bamboo, etc. They can be pulled up or down by cords, or rolled by a spring device. Similar to blinds, they can be operated by a cordless motorized device. Shades were pulled or rolled to varying positions to control light, air circulation, and privacy.

 Top-down and bottom-up model shades were very largely used as you can position them at any level either from the top or from the bottom. Unlike blinds, they were very closely fitted nearer to the window frames and are available in a variety of colors and designs.


Thank you for going through this article. Have a good day 😄.

Share:

Types of positive energy which energizes your home./ How to build positive energy at home.

This whole Universe is made up of infinite energy which runs in a rhythmic pattern. All the matters which exist in this universe have their own vibrational energy to co-exist as a part of the universe.

Since our home where we dwell, also emits energy as a sum total of all types of vibrations. The energy which exists in the home is either positive or negative.


types of positive energy at home/positive home energy
Positive energy


Now let us look into the different types of energy, which affect the vibration of our home, and in the next part, let us go through different ways to enhance the positive energy.


1. Emotional energy


All living beings, especially humans, carry emotions within them. Some are positive in nature like love, and happiness and some are negative like anger, fear, jealousy, etc. Positive energy raises the vibrations of the surrounding atmosphere within your home, and the opposite is true for negative emotions.

 Your family members, and visitors to your home, like your friends and guests, decide the energy level of your home, according to the emotions they carry.


2. Electromagnetic energy


All electronic equipment like t.v., computers, cell phones, etc. emits electromagnetic radiational energy which is negative in nature. The frequency emitted by these devices is unhealthy, which disturbs the normal functioning of our body cells.


3. Physical vibrational energy:


 As I said earlier, all nonliving and living beings vibrate at a particular frequency. The vibrational frequency of glass in your home is different from that of the wooden door. Even different colors have their individual vibrational frequency which does not match each other.

 As your home is made up of a bunch of all these matters, the energy level depends on their arrangement, quantity, color, etc.


4. Magnetic (directional) field energy:


 Our Earth carries a magnetic field, with the north and south axis. So the orientation of our house becomes an important factor in energizing and filling it with positive energy. 

The direction of the opening of the main door, the position of your kitchen and bedroom, ample ventilation, air circulation, etc. are some factors that decide the amount of positive energy carried by your home.


5. Lifeforce energy:


 This energy is omnipresent in the whole of the universe. You can trap them by the pyramid, dome, or arch-like structures, or by keeping items of that shape in your home. Some plants like white basil, bamboo plant(feng shui), and money plants do that job for you.


                                                                                                                              continued 👉

To go through all types of articles related to home & garden, click here.

Thank you for going through this article. Have a good day 😄.

Share:

Things to be known before buying a land/Selecting a right site(plot) to build your own house./Checklist to buy a land.

Before buying a site to build your own house, you have to survey all the pros and cons as per your budget and requirement. The following are the 10 main things (checklist), which should be considered, for buying a site (plot).


Building site


1. Size of the plot:

 First, you have to figure out the area of the house which you want to build on the site. Draw a rough plan of the house including all the necessary things needed by you and your family members.
.
 After calculating the house area, add the offsets on all four sides as per the building bylaws of that region, where you want to build your home. Include predecided open space, vehicle parking area, and garden area, to get a clear picture of the land area which you intend to purchase.


2. Your budget:


 First, you calculate the amount which you can allocate for the site so that in the remaining amount you can build your dream house with the needed facility. Check out the bank loan facility, and the margin amount which you can afford, to arrive at the budget size. This calculation gives you to filter out unnecessary findings and waste of your time.


3. Locality:


 After fixing your budget and the size of the site, now you can search them in those localities of your interest, narrowing your preferences in selecting the right site.

  After preparing the list of a handful of site areas, now the next question which comes into your mind is, which is the best site for me to build my house? To solve that question, you go through the following checklists, to have a clearer idea.


4. Ground stability:

 Check the soil type of the site, by testing some samples. Unstable earth with low bearing capacity will increase the foundation cost and in turn, it will affect your budget.


5. Utilities


Check out the drainage facility, water supply line, electric supply with the nearby connection point, gutter for the rainwater, etc,.and compare them in all of the sites lists.


6. Accessibility:


 Check out for the good road connectivity, schools,  colleges, public transport facility, grocery markets, hospitals, etc. Later on, this cost of transport will add to your monthly budget.


7. Atmosphere:

 Check out the availability of sunlight for your solar panel, air circulation, ventilation, nearby gardens for morning walks, etc. If there is a tall structure nearby, which blocks all such basic needs, it is better to drop such sites from your list.


8. Ground level

Always the ground level of the site should be nearer to or above the road level. Filling the ground will add extra weight to your budget.
 

9. Disturbances


Factory


You have to make a good survey of the area, for nearby railway tracks, home industries, factories, etc. as they create air and noise pollution disturbing your mental peace.


10. Positive energy and Vastu:


Vastu Purusha.


When you enter the site area, it should give you a refreshing filling which indicates the positive energy circulation on site. The site should be of uniform size(triangular plot should be avoided) with the east-facing road as the site entrance(as per Vastu).

After finishing all these checklists, you will arrive at the right decision to buy the best site to build your dream home. 

For all such articles over useful tipsclick here.

Thank you for going through this article. Have a good day 😄.

Share:

What are shower head filters?- advantages of using shower head filters.

shower head filters/shower filters/advantages of shower filters
shower head filter
            
    The filters, that are used in the showers to remove harmful chemicals, chlorine minerals, and microorganisms from hard water and make it into healthy and soft water as needed by your hair, skin, and body are referred to as shower head filters.

They come either as an inbuilt system type or attachment from outside to the existing system.

The filter media needed to be replaced at regular intervals depending upon its size, type, and capacity. The time period usually ranges from 3 months (or 3000-gallon water) to one year (or 13000-gallon water)

Several filter media like ceramic balls, activated carbon, zeolite, K.D.F., clay balls, magnesium balls, far infrared beads, ion exchange resins, vitamin c, etc were used in forming the filter layers. Each type of filter media has its own contribution, in softening cleaning and enhancing the quality of water. So they were used in multilayers, forming stages one over the other.

The price of the shower filter depends upon its replacement time, functionality, filtering capacity, usability, etc.

The advantages of using shower filters are, it reduces dandruff formation, prevents hair loss, lessens eye irritation, reduces skin allergy, rough and cracked skin problems, etc. if caused by using the existing tap water.

Nowadays, a wide range of shower filters are available in the market and you can go for the one which suits your need.


Share:

Difference between moorum and soil. /What is the difference between murum & soil in construction?

Moorum:

Moorum(or murum) is the word derived from the Tamil language, which means powdered rock.


Moorum


Moorum is also a type of soil, mostly used for construction purposes. Generally,  it is deep brown or red in color. Moorum is used in plinth filling, road pavements, backfilling in trenches, footing pits, etc. It is a suitable type of soil in the construction field, since it does not contain any organic matter and can be compacted easily forming hard surfaces.

Soil:


Soil

The soil is defined as a complex mixture of minerals, gravels, organic matter, rock particles, etc. In other words, the soil is the upper crust of the earth, supporting animals and plant growth with countless organisms within it.

To go through the comparison & difference between the several types of building materials & construction costs, click here.


Thank you for going through this article. Have a good day😄.


Share:

What is garden ornaments?/Garden ornament and their types.


Garden ornaments are the items or articles used in the gardens, parks, and landscaping to enhance the beauty and appearance to have a pleasing look.


what is garden ornaments?/garden ornaments and its types/different types of garden ornaments
Garden ornament

They are made up of weather-resistant materials like stone, concrete, terracotta, ceramic, rustproof alloys and metals, synthetic materials like resins, plastic polymers, etc. Garden ornaments can be broadly classified as follows.


1. Garden plaques

They can be either horizontal or vertical wall plaques. They appear in huge patterns with scripts and carvings to represent history, names, memorials, or certain garden signs.


2. Garden statuary:

 The statue can be of anything like birds, insects, animals, plants, angels, etc. They are placed depending on the surroundings like the tortoise in the pond, or butterfly in a garden, which fits accordingly to give a natural look.


3. Garden fountain:

 Fountains are the main center of attraction in public parks and gardens. They are decorated with lights of different colors, which gives a must-see look at nighttime.


4. Garden urns:

 They are decorative types of ornaments usually placed on either side of the pathway or at the entrance. They also serve as beautiful planters with an artistic look.


5. Garden obelisks:

They are made up of different materials or living obelisks by cutting and shaping the plant. The plant needs to be pruned periodically to maintain its shape.


6. Garden arches:

 Similar to the obelisk, they are either living or non-living ornaments. Plants were allowed to grow on arches to give them a pleasant look.


7. Garden ponds and bridges:

 The inclusion of a water body with cross-over bridges gives a broader look to the parks, which attracts more public, especially children.


8. Garden hanging:

 Bird's nests, wind chimes, artistic pots, artificial fruits, etc. are some examples that are hung to decorate the garden. Such types of ornaments can be mostly seen in home gardens.


9. Garden furniture

They serve two purposes in gardens and parks. You can sit and relax over them and also they add their contribution to the decoration of gardens.

To have a clearer idea with images, for all the above-said 9 types of garden ornaments, you can watch the video given below.


To go through all types of articles related to home & garden, click here.

Thank you for going through this article. Have a good day 😄.

  
Share:

Field test for good quality of burnt clay bricks.

Now let us see the different types of field tests to find out the good quality of burnt clay bricks.

Burnt clay bricks

 1. Shapes and sizes

It should have sharp edges with uniform shape and size. The maximum allowance at both ends should be  ±3 mm.


2. Colour test:

 It should be in deep red or copper-like color. Black or clay-like color indicates the brick is of low quality.


3. Sound test

When two bricks were stuck with each other, it should give a clear metallic sound.


4. Hardness test

When we scratch the brick with our fingernails, it should not leave any impressions. Such bricks are considered good-quality clay bricks.


5. Drop test

When dropped from about a  height of 1.2 m. to 1.5 m., the brick should not break into pieces to ensure its good quality.

To go through the field & laboratory tests conducted in civil engineering,  click here.

    Watch the video given below to see the clippings of all the tests.


Thank you for going through this field test . Have a good day 😄.
Share:

Calculating the volume of cement bags in cubic meter, cubic feet, & in liters.

Cement bags

As you know, the density of cement is 1440 kg/cum.

The weight of one bag of cement is 50 kg.

From density, we know that 1440 kg of cement will be one cum. by volume.

To get the volume of 1 bag of cement in cum., we will divide 50kg. by the density of the cement.

        i.e.        50 kg ÷1440 kg/cum.
         
                    = 0.03472 cum.


Since 1 cum. is equal to 1000 liters,

The volume of one bag of cement in liters

                 =0.03472×1000
                
                 =      34.7 liters.


Similarly, the volume of cement bags in cu.ft.

               =0.03472×35.315
              
               =   1.226 cu.ft. 

(as 1 cum. =35.315 cu.ft.).


To go through the articles on Estimation & calculation in civil engineering, click here.


Share:

Different types of building bricks./Classification of bricks & blocks used in construction.

Now let us go through the different types of bricks/ blocks which are used in the construction industry.

CLC. blocks


1. Burnt clay bricks:

 These are the traditional type of bricks, manufactured by using clay as raw material and burning them in a kiln.


2. Fly ash bricks:

They are manufactured in a hydraulic pressing machine, followed by water curing. The ingredients used are fly ash, cement, grit, and sand.


3. Concrete blocks:

 These blocks are manufactured by hydraulic as well as manual machines. They are pressed in a mold of different shapes and sizes.

 Mainly they are classified as,
 a)   Solid concrete blocks and
 b)  Hollow concrete blocks.
Raw materials used are cement, sand, grit, and aggregates.

.
4. Compressed mud blocks:

 Raw materials used are soil, cement, lime, and gypsum. Here, the soil should have certain criteria, which are used in making these types of blocks. They are compressed in machinery either manually or mechanically and then cured to gain strength. 

The shades of these blocks changes as per the soil type and its color.


5. CLC blocks:

 The full form is cellular lightweight concrete blocks. Raw materials used are cement, foam, fly ash, or sand. As the name suggests, light wt. is achieved by using foams in the ingredient. 

They come in different densities with varied shapes and sizes.


6. AAC blocks:

Autoclaved aerated concrete blocks are also lightweight blocks, similar to CLC blocks. But, the manufacturing process differs in both these types of blocks. These types of blocks are cured in autoclave chambers for a short period of time. 
Raw materials used are cement, aluminum powder, gypsum, fly ash, or sand.

7. Sand-lime bricks: 

They are also known as calcium silicate bricks. Raw materials used are sand lime and gypsum.


8. Refractory bricks:

 These types of bricks are used in foundries, as they can sustain high temperatures and reduce heat loss. Aluminum silicate is the key ingredient, which contributes to these properties of the brick.

To go through the articles related to the different types (classifications) of construction materials, click here.

If you feel like seeing images of all types of bricks/blocks with an explanation, you can watch the video given below.


Share:

Field test for good quality of cement./ Different methods to check the quality of cement.

field test for good quality of cement/field test for cement/cement tests/different site test for cement
Cement

Following are some field tests, that should be carried out to know the quality of cement.

 1. Date of packing:

 It should be within 3 months at the time of purchase.


2. Lumps test:

 It should be free from any lumps which might be formed due to atmospheric moisture.


3. Colour test:

 Cement should be of uniform grey color, with a light green shade.


4. Float test

When little quantity of cement is poured into a bucket of water, some part of it should float on the water for a few seconds, forming pockets before sinking.


5. Setting test:

 A thick paste of cement should be applied evenly over the piece of glass. After an initial setting time of 30 minutes, it should be kept in water for 24 hours. 
The next day, when you test the cement, it should be hard in a single piece, if it breaks into several pieces then the cement is not of good quality.


6. Adulteration test:

 When cement is rubbed between two fingers, you should get the smooth feeling of fine powders. If you feel the rough grainy texture, then there is a possibility of adulteration.


7. Temperature test: 

When kept over the palm, you should feel the normal atmospheric heat. It should not be much warmer.

To go through the field & laboratory tests conducted in civil engineering,  click here.

For a better explanation, you can watch the video given here.


Thank you for going through this field test . Have a good day 😄.

Share:

Calculation of water stored in a rectangular tank./ How to calculate the volume of water in a rectangular water tank?

Let us consider a rectangular tank of size as given below.


water capacity of rectangular tank/rectangular water tank/calculation of water stored in a rectangular tank
Rectangular water tank


   Given data:

                  Length = 10ft. 

                    Width = 7ft.     

                  Height = 5ft.

                 Volume = [L × W × H]
                             
                               = [10ft .× 7ft .× 5ft.]
                              
                               = 350cu ft.

 
Now, as you know  1 cu ft.= 28.317 liters.

 Converting volume into liters,

   = [350 × 28.317]
 
   = 9910.95 say  9911.0 litres

So, the water that can be stored in the water tank is 9911 liters.


Converting it into gallons,

 1 gallon = 3.785 liters.

Water stored in gallons 

  = [9911 ÷ 3.785] 

  = 2618.5 gallons


If you need a better explanation, then please watch the video given below.


Share:

Difference between asphalt, bitumen, and tar./What is asphalt, bitumen, and tar?

   Asphalt, bitumen, and tar are defined below.


Asphalt road

  Asphalt:

It has two basic ingredients. Stone aggregates, sand, and gravel form the first part with a 95% share and 5% of bitumen as the other part. Here, bitumen is the binder material, which holds together all the ingredients. 
The primary use of asphalt is in road construction. They are manufactured in hot mix plants at a specific temperature. In America, & some parts of Europe, asphalt also refers to bitumen.


Bitumen:


Bitumen


It is a black viscous liquid, which is used as a binder material in making asphalt. It is a hydrocarbon, obtained naturally or as a residue in the distillation of petroleum.
 Bitumen is used in making paints, roofing materials, etc. other than road works.


 Tar:

Coal tar


 It is the thick black liquid produced by the destructive distillation of coal. In the process of manufacturing coke and coal gas from coal, tar is produced as a by-product.
 Used in making paints, synthetic dyes, and in manufacturing medicines related to skin symptoms. Since it is carcinogenic in nature, its usage is limited in making tar roads.      

To go through the comparison & difference between the several types of building materials & construction costs, click here.


Thank you for going through this article. Have a good day😄.


Share:

Different types of soil compaction tools./ Mini soil compacting tools/Soil compaction machinery.

Soil compaction tools are construction equipment, which is used to consolidate soil and hence increase the load-bearing capacity of the soil. Now, let us go through the mini compaction tools, particularly used in buildings and trenches.

They are broadly divided into 3 main types.

1. Rammers: 


Compaction is achieved by the impact load generated by the tool. They are, either manual or mechanical types to work with. Rammers are most suitable for cohesive-type soils as they can be consolidated in a better way by impact load. 

Since the working area of these tools is small, they are ideal for trenches and small pits.  They are easy to operate in congested areas where using other types of compaction tools is not possible. 


2. Vibratory plate compactors:


Here, the compaction is done by the vibratory action and dead load of the machine. Unlike rammers, the base plate area is more, which covers a larger space area during compaction. But the effective compaction depth will be normally between 15cm. to 40cm.  for soil layers. 

Plate compactors are most suitable for the granular type of soil. They are either single-direction or reversible direction types of plate compactors. 

Reversible direction compactors are heavier with a larger base plate when compared to single-direction types. They can be moved in both forward and backward motion.

3.  Hand roller compactor


They are, either manual or mechanical types of roller compactors. In the manual type, the roller is made of stones, concrete, or steel materials to carry weight. Here, consolidation is achieved only through the dead weight of the machine.

 But vibration with deadweight gives better compaction in mechanical rollers.

 Mechanical rollers are further subdivided into single-drum types and double-drum rollers according to the no. of drums carried by the machine. A small water tank is provided over the machine to drip water over the roller at the time of compaction.


To go through the articles related to the various types of construction machinery & toolsClick here.


To have a better understanding, it is advisable to watch the video given below which carries an explanation with images.


Share:

Translate

Blog Archive

popular posts

Recent Posts

Google search